
Create custom evaluations to use in place of the ASHP Learning Experience and/or ASHP Preceptor Evaluations, or to assess learning within a learning experience, during formative feedback, or on demand throughout the program.
Important: ASHP prefers programs to use the ASHP standard evaluations for required evaluations.
This function is available to all users who have the “RPD” or “Designee” role.
Before You Begin
Custom evaluations must include at least one section and one question before they can be scheduled.
Instructions for Building Custom Evaluations
1.Access the Page
- Click the Manage Program button.
- Select the Tools tab
- Click the Manage Custom Evaluations link.
2. Add the Evaluation
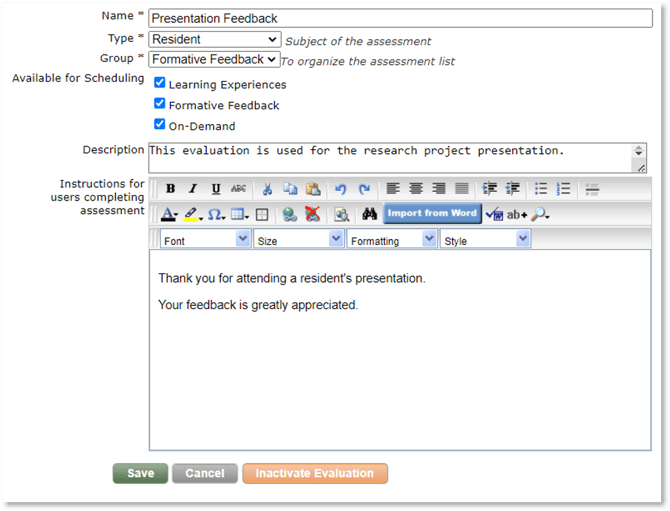
- On the Add/Edit Residency Custom Evaluations page, click Add Evaluation link.
- Enter the following information and click the Save button.
|
Field |
Description |
|
Name (required) |
Title of the evaluation. This will display on the Global Task list and the email notifications. |
|
Subject (required) |
Select the subject of the evaluation (Learning Experience, Preceptor, or Resident). |
|
Group (required) |
Select or create a new group. This designation is only used on the Add/Edit Residency Custom Evaluations page to organize the list of evaluations. |
|
Available for Scheduling |
This field indicates where in PharmAcademic this evaluation will be available to schedule: Learning Experience, Formative Feedback, and/or On Demand (you may select multiple options). |
|
Description |
Enter a brief description of the evaluation. This information can only be viewed on this page. |
|
Instructions for Users Completing Assessment |
Enter instructions that will appear at the top of the page for users when completing the evaluation. |
3. Create Sections
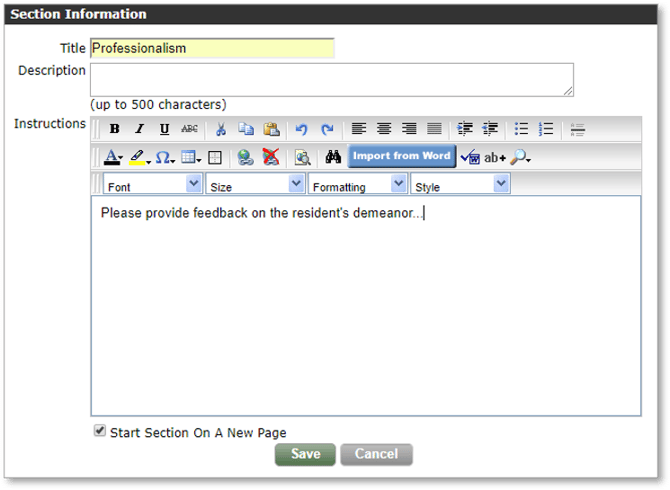
PharmAcademic custom evaluations must have at least one section, but you can add as many as you need. Each section is displayed to the evaluator with a blue box at the top containing the section title and instructions/additional information for the section. You may select to start a new page with each section. The section name will appear in the drop-down menu at the top of the evaluation to move from page to page.
To create the first section:
- Click the Add Section button.
- Complete the Section Information. (optional)
- Select Start Section On a New Page if you would like this section to begin on a new page in the evaluation. Note: In edit mode, all sections are displayed on separate pages.
- Click the Save button.
- Title will be displayed in the blue box at the beginning of the section.
- Description is only visible when creating/editing the evaluation.
- Instructions is the text that is displayed for the evaluator in the blue box at the top of the section.
4. Add Questions
Once a section is created, you can add one or multiple questions to the section. (Each section must have at least one question). Questions will be numbered automatically; you do not need to enter numbers.
To add a question:
- Click the Add Question(s) button. Note: Be sure to add questions in the correct order; evaluation questions cannot be reordered.
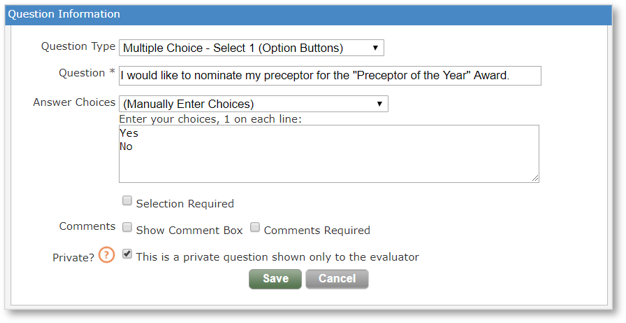
- Select the Question Type from the drown-down menu. Note: See question type options below.
- Enter the Question in the text box.
- Select the Answer Choices from the drop-down menu. Select “Manually Enter Choices” to enter unique answer choices. Type each answer choice on a separate line in the Answer Choices text box.
- Select the title of a scale to use a pre-defined custom evaluation scale. Note: If you want to assign values to your answer choices, then you must create an evaluation scale.
- Select the Selection Required box if you would like the question to be required. Evaluators will not be able to submit an evaluation until all required questions are answered.
- Select the Show Comment box if you want a comment box to be available for evaluators to enter comments related to this question. Select Comments Required to make the response required. Note: Please see the Question Types below to determine which question types include a comment box.
- Select “This is a private question shown only to the evaluator” if you would like for this question to be private. Note: Only available for multiple choice and text question types. Private questions are available for the evaluator to view and respond to, but they cannot be viewed once the assessment is submitted (by either the evaluator, cosigner, the subject of the evaluation, or the program.) Private questions and responses to them can be viewed on all evaluation reports. We suggest placing private questions at the end of the assessment. Placing them within an assessment will cause the numbering to appear incorrect on submitted assessments.
- Click the Save button.
Question Types
The following table describes the types of questions available in PharmAcademic.
|
Item |
Description |
Private Question Option? |
Comment box option? |
|
Multiple Choice – Select 1 (Option Buttons) |
Multiple choice question with answer choices displayed with radio buttons. |
Yes |
Yes |
|
Multiple Choice – Select 1 (Dropdown List) |
Multiple choice question with answer choices displayed in a dropdown list. |
Yes |
Yes |
|
Multiple Choice – Select Multiple (Check Boxes) |
Multiple choice question with answer choices displayed next to square check boxes. Multiple answers can be selected. |
Yes |
Yes |
|
Rating Scale |
Grid style rating scale with answer choices displayed horizontally and multiple questions displayed underneath. |
No |
No |
|
Rubric |
Rubric template with multiple questions, answer values and text. Values for answers are displayed and summed. |
No |
No |
|
Text Only |
Text response. |
Yes |
No |
|
Numeric |
Numeric responses only. Can set minimum and maximum value limits. Negative values and decimals are permitted. |
No |
No |
5. Continue to Build the Evaluation
Use the following buttons and links to continu e adding questions and building additional sections:
Questions
-
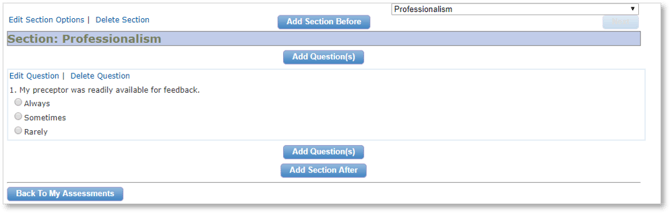
Click the Add Question button to add more questions.
-
Click the Edit Question link to open the “Question Information” window to edit.
-
Click Delete Question to remove the question.
Sections
-
Click the Add Section After button to create a new section. Note: Each section must have at least one question. Add at least one question prior to adding a new section.
-
Click Edit Sections Options to edit the section title, description or instructions. You can also change the order of sections once multiple sections have been added.
-
Click Delete Section to remove a section.
Related Articles
Managing Custom Evaluations