
This document includes instructions for completing the E-RDP for both Residents and RPDs/Designees, along with guidance for RPDs/Designees on managing the process, including sending a plan back for edit, overriding a plan, finalizing a plan, printing, and tracking completion status.
This task can be completed by Residents, RPDs and Designees.
Important: The Electronic Resident Development Plan process begins with residents completing and submitting their portion of the plan. Once submitted, the RPD receives an email notification, and the RPD and Designee can review the resident's assessment, add their responses, and finalize the plan.
Before You Begin:
- Required: The Electronic Resident Development Plan is required by ASHP, and PharmAcademic automatically assigns it to all residents during enrollment.
- Resident Closeout: You cannot complete the resident close-out process in PharmAcademic if there are unsubmitted Electronic Resident Development Plans. You will be directed to exit the close-out process, navigate to the resident’s Development Plan tab, and either remove or finalize the plan(s). After a resident has been closed out, they can no longer access E-RDPs; however, RPDs and Designees retain access to all plans.
- Due Dates: The Initial Electronic Resident Development Plan, including the resident self-assessment, is due 30 days after the resident's start date. Subsequent updates are due every 90 days for quarters 1, 2, and 3. PharmAcademic displays a Resident Due Date that is 7 days before the final due date to allow time for RPD/Designee review and finalization.
- Notifications and Reminders:
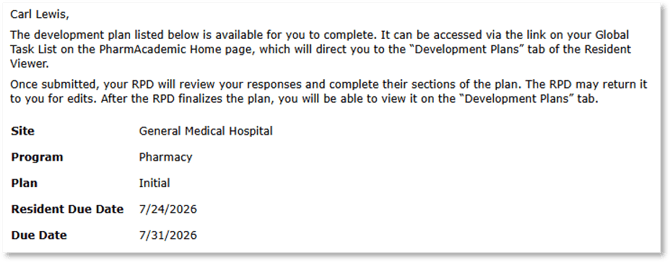
- Residents receive an email notification and PharmAcademic task 60 days prior to the due date for the initial plan, and 30 days prior to the due date for subsequent updates. Additionally, they receive a reminder for unsubmitted plans 3 days prior to the due date, 3 days after due date, and 7 days after the due date and continuing weekly until submitted or the next quarterly update is available. The notification and task will display both the Resident Due Date (7 days prior) and the Due Date.
- Residency Program Directors receive a PharmAcademic task 1 week prior to the due date for the initial plan and subsequent updates. RPDs do not receive email notification for individual development plans; instead, they receive an email on the 1st and 15th of every month that lists all outstanding Electronic Resident Development Plans for all residents at programs where they are the RPD. RPDs also receive a notification email when the resident submits their portion of the plan.
- Printing: The E-RDP can be printed once it has been finalized. RPDs and Designees can also print a draft version of the plan.
Caution: To prevent saving issues, multiple users should avoid editing the same plan simultaneously.
Instructions for Completing the E-RDP
Step 1: Access the Electronic Resident Development Plan
Go to the Resident’s Development Plans tab to access the E-RDP.
Task List
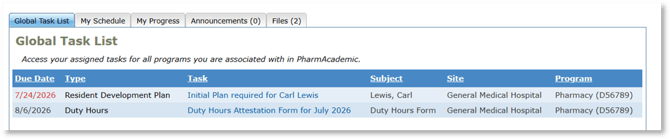
RPDs and Residents can quickly navigate to the Development Plans tab by clicking the task on the Home page.
Development Plans Tab
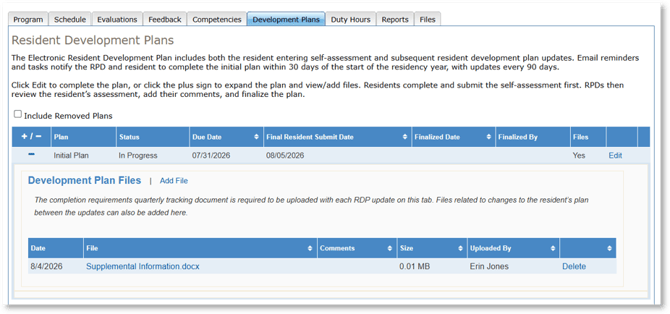
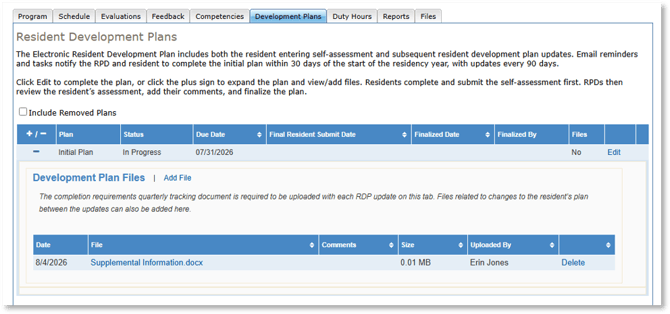
When a plan becomes available, it will appear on the grid located on the Developments Plan tab. Once listed, residents, RPDs, and Designees may initiate or edit the plan, regardless of whether they received a notification or task.
The grid includes the name of the plan, its status (New, In Progress, Finalized), and the due date. The plan will be displayed in red if it is past the due date. The grid also displays the date the resident submits the plan (with the final submission date, if sent back for edit), the date and individual who finalized the plan, and whether there are associated files.
Note: RPDs and Designees can click the Remove link to delete the plan. Once removed, deleted plans can be viewed on the grid by selecting the box “Include Removed Plans.”
Step 2: Initiate the Plan
- Click the Edit link to start or edit the plan.
- Use one of the following methods to navigate through the form:
- Select a page from the drop-down menu in the upper-right corner.
- Use the Next and Previous buttons.
- The form saves automatically as you move between pages. You can also click Save at any time.
- If you need to complete the plan later, click Exit.
Step 3: Review Available Information
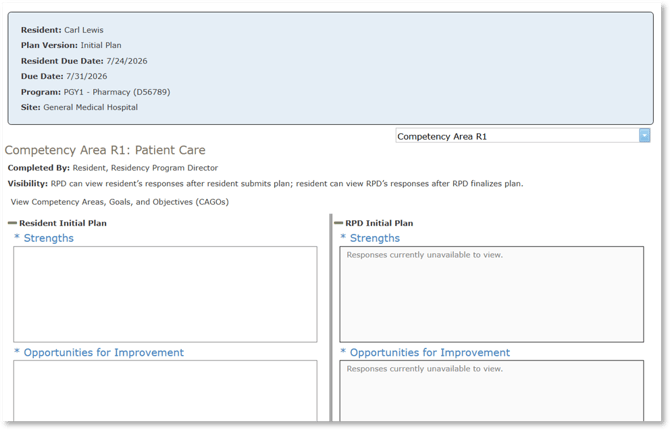
- Collaborative View: Residents and RPDs enter responses on the same pages. Residents enter responses on the left side and RPDs enter responses on the right side. RPDs can view the resident’s assessment after the resident submits the plan; residents can view the RPD’s responses after the RPD finalizes the plan. These are read-only views and cannot be edited.
- Historical View: Responses from past finalized plans are available for reference while completing the current plan. Prior submissions (listed with submit dates) are hidden when you first enter the plan. Click the Plus Sign (+) to view them.
- View Competency Areas, Goals and Objectives (CAGOs): Users can download a CAGO report from the Competency Area pages for reference when completing assessments.
Step 4: Complete Assigned Sections
Answer all required questions assigned to you. At the top of each page, users are reminded who is responsible for completing each section and when their responses become visible to other users.
The table below includes a list of the pages in the electronic form and who is required to complete them.
|
E-Resident Development Plan Page |
Resident |
RPD (Designee) |
|
Strengths and Opportunities for Improvement Initial Plan Only |
x |
|
|
Practice Interests |
x |
|
|
Career Goals |
x |
|
|
Well-being and Resilience |
x |
|
|
Competency Evaluations |
x |
x |
|
Planned Changes to the Program |
|
x |
|
Objectives Achieved for the Residency Displays current status of all objectives assigned to the resident. RPDs: To update, exit the plan and edit the ACHR status on the resident’s Competencies tab. |
Data pulled from PharmAcademic |
|
| Additional Items and Submission |
X (optional) |
X (optional) |
Step 5: Submit or Finalize the Plan
Residents
- Navigate to the last page of the electronic form, “Additional Items and Submission.”
- Click the Submit button.
The RPD will be notified and can review your assessment, add responses, and finalize the plan. Residents can no longer view the plan after submitting it until the RPD finalizes the plan.
RPDs/Designees
Navigate to the last page of the electronic form, “Additional Items and Submission.” RPDs and Designees have the option to send the plan back to the resident to update, finalize the plan, or override the plan by submitting without resident responses.
Send Back for Edit
- Click the Send Back for Edit button.
- Add comments for the resident.
The resident will receive an email with the comments, and the task will return to their task list. Note: You can later view the send back for edit history on the Development Plans tab by clicking the Plus Sign (+) to expand the grid.
Finalize the Plan
Click the Finalize Plan button. Note: Once finalized, the plan can no longer be edited.
The resident, RPD/Designee, preceptors on the resident’s schedule, and RAC members are notified via email and can view the plan and supporting documentation on the Development Plan Tab.
Overriding the Plan
Residents must submit the initial plan, but RPDs can override quarterly updates without the resident having submitted it by clicking the Override button. This option is only available after the plan is overdue and should be used sparingly as the resident’s assessment is required by The Standard.
Step 6: Add Supporting Files
After the plan has been delivered, RPDs and Designees can upload files related to that specific development plan update. Supporting files are visible to anyone with access to the Development Plan tab.
- Navigate to the resident’s Development Plan tab.
- Click the Plus Sign (+) to expand the grid.
- Click the Add File link.
- Enter File Comments (optional).
- Click Choose File, select the appropriate file from your file manager, and click the Upload button.
Instructions for Tracking Completion
Resident Dashboard
The Resident Dashboard (Dashboards button > Residents tab) displays alerts for missing development plans. Additionally, under the alerts, the “Residents Enrolled” grid shows the number of development plans submitted for each resident. By clicking on that number, you can navigate directly to the resident’s Development Plan tab.
Reports
- Use the “Overall Electronic Resident Development Plan Status” report (located on the Program Reports tab) to view the status of all Electronic Resident Development Plans for the program.
- The global “Overall Electronic Resident Development Plan Status” is available on the Global Reports tab of the Home page allowing users to download reports for one or more sites and programs. Report data is available only for programs where the user has the RPD and/ or Designee role in PharmAcademic.
- Information about Electronic Resident Development Plans is also available on the “Send Back for History” and “Overdue Tasks” Program Reports.
Instructions for Printing the E-RDP
- Finalized Plans: Once an E-RDP has been finalized, it can be downloaded from the Development Plans tab. Click the View link for the plan, then click the Download Finalized Plan button to download a PDF copy.
- Draft Plans: While an E-RDP is in progress, RPDs and Designees can download a draft by clicking the Download Plan Draft button at the top of any E-RDP page. Residents cannot download draft E-RDPs. Drafts reflect the responses currently displayed in the E-RDP. Responses entered by the RPD/Designee are always included, while resident responses are included only after the resident has submitted their portion of the plan.