
Workload can be added to a protocol in one of two primary ways: by importing a workload template or by manually adding subcategories directly to the protocol. During certain transactions, like Shipment Receipt, Vestigo provides an additional pathway to add workload during the transaction.
If you are adding workload to an active protocol, the workload added only applies to new transactions going forward and does not retroactively apply workload.
Prerequisites
-
Workload SubCategories have already been established
When adding Scheduled Workload to a protocol from any method, the workload will not be automatically recorded until the start of the following month. If it needs to be recorded for the current month, consider recording an Ad-Hoc workload.
Importing a Workload Template
If your site has already established workload and created templates, those templates can be imported into existing protocols. Templates can be applied even when workload has already been added, allowing users to supplement or standardize existing protocol data.
Templates are unable to be imported into existing orders and must be added manually.
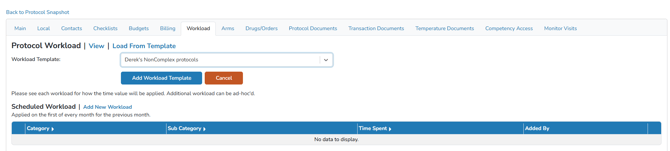
- Navigate to the protocol
- Click on Edit Protocol
- Click on the Workload tab
- Click the Load from Template link
- Select the Template Name from the drop down
- Click the blue Add Workload Template button
- If the template included dispensing workload, the user will need to apply these to the order build manually
Optionally, users can apply multiple workload templates to a single protocol by following the same process. Adding additional templates will not overwrite existing workload; instead, it will append new workload subcategories to the protocol.
Adding Workload to a Protocol
If you do not have templates created quite yet but do have the subcategories created, you can add them to the protocol without a template to start recording times.
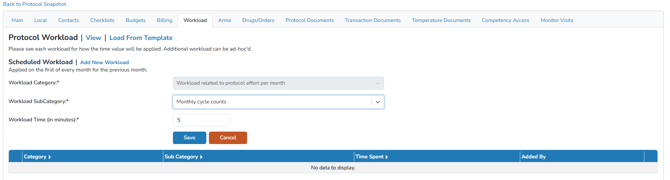
- Navigate to the protocol
- Click on Edit Protocol
- Click on the Workload tab
- Determine which Category the workload should be in and click on Add New Workload
- Select the Workload SubCategory from the drop down menu
- (Optional) Modify the time value, if needed
- Click the blue Save button.
- Repeat as necessary to add all appropriate workload to each of the categories.
Adding Workload During a Transaction
During certain transactions like Shipment Receive or Send Outs, users are given the option to add workload to the transaction. When a user adds workload from this pathway, it will record the workload for that transaction, but it also adds the workload to the protocol. This means that on future similar transactions, the workload will appear and be able to be recorded.