Closing Out a Protocol is an important function to perform when the protocol is no longer active at your site. When a protocol is closed out, it no longer counts against your site's contracted amount of protocols that you can have active at one time. Once a protocol is closed out, users will still be able to access the protocol and run reports, but won't be able to make any corrections or updates to inventory historically received.
The Vestigo close out wizard will guide users through each step of the process to close out the protocol .
- Review Protocol Close Out Checklist
- Remaining Inventory for this Protocol
- Manage Outstanding Drug Returns
- Patient Enrollment
- Pending Protocol Charges
- Protocol Billing Accounts
- Workload and Confirmation
Required Permissions
ProtocolCloseOut - Ability to close out a protocol via the close out process.
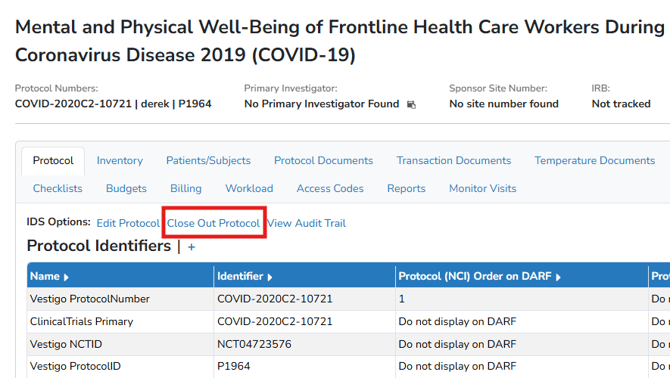
To start the process, navigate to the protocol you wish to close out and click on the Close Out Protocol link that is located on the Protocol Snapshot, next to the Edit Protocol link.
Step 1 - Review Protocol Close Out Checklist
If a Protocol Close Out Checklist has been initiated on the protocol, the first step in the close out process will allow the user to review those steps.

A user can click “Manage Steps” if any steps need to be completed, edited or deleted.
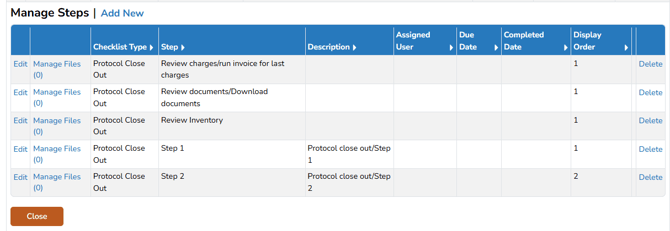
Checklist steps do not need to be completed to close a protocol.
Step 2 - Remaining Inventory for this Protocol
The second step in the close out process allows the user to review and process the remaining inventory on hand, this ensures the study will be closed without any lingering inventory to manage.
This step is divided into two sections: One section at the top displaying inventory that requires a quarantine verification and therefore can only be Quarantined, and another section below for any other inventory that does not require a quarantine verification and can be moved into any disposition – quarantine, destruction or return to sponsor.
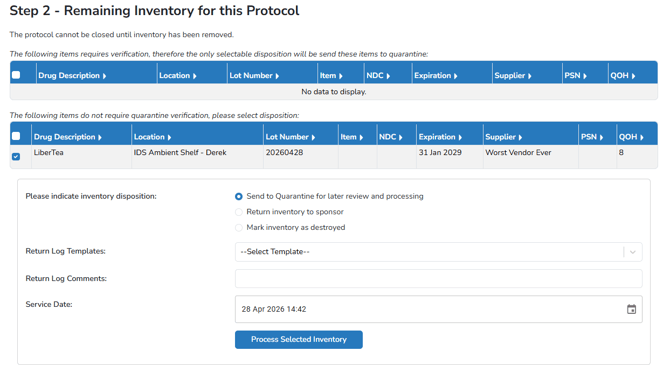
To continue to the next step, all active inventory on hand must adjusted out of available inventory. Then the “Next” button will be enabled, allowing users to move to Inventory in Drug Returns, which includes participant returns and quarantine.
Step 3 - Manage Outstanding Drug Returns
The definition of Returns for this section include quarantined inventory and Participant Returns.
The third step presents any returns to manage as destroyed or returned to sponsor. Participant returns and inventory in quarantine are separated by radio buttons. Participant Returns is selected by default.

Like the previous step, drug returns are divided into two sections. If returns of any kind require verification, the user must verify, or override the verification, if allowed by the site. If the return does not require verification, it will appear in the lower section of the page.
For any items that do need verification or override, once that is complete, the user must click “Close”. The items will shift to the bottom grid where they can be destroyed or returned to sponsor.
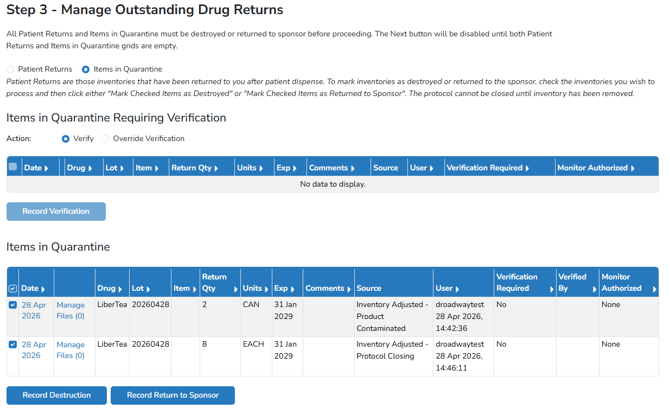
To continue to the next step, all returns on hand must have a final disposition of Destroyed or Returned to Sponsor. Then the “Next” button will be enabled, allowing users to move to participant unenrollment.
Users will not be able to enter new or edit current prescription returns or adjust inventory on a closed study.
Step 4 - Patient Unenrollment
The fourth step is where the user will unenroll all patients remaining active on the study. This step is made easier by allowing the user to use the “check all” button and unenroll patients in bulk rather than one by one. The user can also add a reason for unenrollment, but it isn’t required.
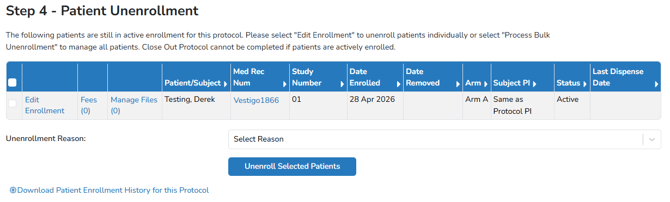
The patient enrollment report is also available to generate from this step.
Step 5 - Pending Protocol Charges
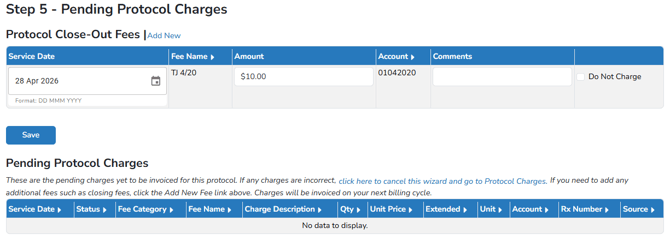
The fifth step presents any remaining charges on the study for review. If any charges need to be edited, or other charges added, the user should cancel out of the Close Out process and navigate to the Billing tab to manage any charges. The charges cannot be invoiced from this screen, however, the user can generate a billing cycle from Billing Management, if needed.
Any “Close Out Fees” added to the Manage - Billing tab will be presented on this step, as well. If any other close out fees need to be added, the user can use the “Add New” link located at the top. To charge any close out fees, the user must click Save.
Step 6 - Protocol Billing Accounts
While this step allows the user to inactivate the billing account easily, this is not required and may not be appropriate to do.
Here is more information about billing accounts and fees on a closed protocol:
- Once the protocol is closed, the fees established on the protocol will no longer be charged on a recurring basis, even if the billing account is not inactivated.
- If the billing account is not inactivated when the protocol is closed, and protocol is reactivated, recurring fees may start charging if the protocol is open during the frequency and anniversary dates established on those fees.
- The charges listed in Step 5 will be invoiceable any time, even if the protocol is closed.
- If the billing account on the protocol is also on another protocol, that billing account cannot be inactivated on this step. If the user attempts to inactivate the account, a validator will be displayed to alert the user of this.

Step 7 - Workload and Confirmation
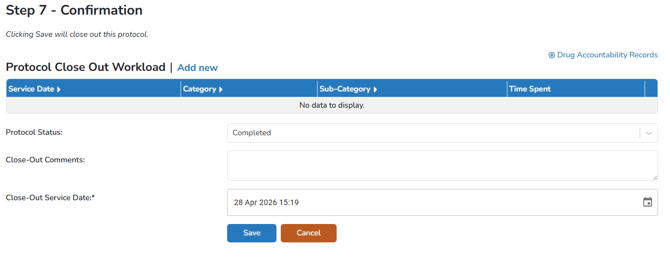
This final step allows the user to manage Workload and confirm the close out of the protocol.
If Close Out Workload was added to the protocol’s Workload tab, that Workload will display and “charge” when the protocol close out is saved.
If the user wants to add more workload to the close out process, or they did not have a Workload added to the protocol beforehand, they can use the “Add New” link to add any Close Out Workload.
Step 7 is also the final step in the Protocol Close Out process. The user can select a status (these options are system set and not modifiable), enter close out comments, and provide a service date and time for the close out (in the case where the close out actually occurred on a different date).
|
Completed: |
Study has concluded normally; participants are no longer being examined or treated (i.e., last patient's last visit has occurred) |
|
Terminated |
Recruiting or enrolling participants has halted prematurely and will not resume; participants are no longer being examined or treated |
|
Withdrawn: |
Study has been halted prematurely, prior to enrollment of first participant |
If any actions need to be taken against a closed protocol, users can simply reactivate the closed protocol by selecting the “Manage Closed Protocol” on the front screen. Monitors and Read Only Users can see a closed protocol.
Users may still navigate to the Inventory tab on a closed a protocol, and access Manage Drug Returns in order to generate a Certificate of Destruction from the Items Already Destroyed queue.
To reactivate the protocol, simply toggle to the Reactivate Protocol tab, select a status, and click Reactivate.
The Manage Close Out tab allows a user to add notes about the close out and any document storage information.