
Creating a shipment receipt is one of the core functions of Vestigo and the only way to add inventory to protocols. Users will record shipment details at a high level before they start to record inventory details from the shipment.
Optionally, users can also record any IDS fees or workload to capture all metrics as needed. At any time during the shipment receipt process, users can click Save Progress and Close to come back later and finish the receipt, or even have another user complete the shipment.
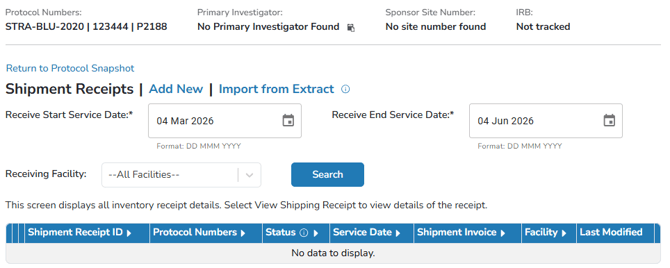
This guide is broken down into sections and covers how to create a shipment receipt from an external source such as a sponsor and not from an internal send out.
- Create a New Shipment Receipt
- Enter Shipment Receipt Details
- Inventory Details
- Workload and Billing
- Confirm Receipt
Permissions Needed
InventoryReceive – Ability to receive inventory.
Users must be able to access to the protocol to receive inventory, which may require additional permissions.
Creating a Shipment Receipt
- Navigate to the protocol
- Users may have to complete any competencies that are associated with the protocol.
- Click on the Inventory Tab
- Click on Receive Inventory
- Then click Add New and move to section: Receipt Details
Step 1 - Receipt Details
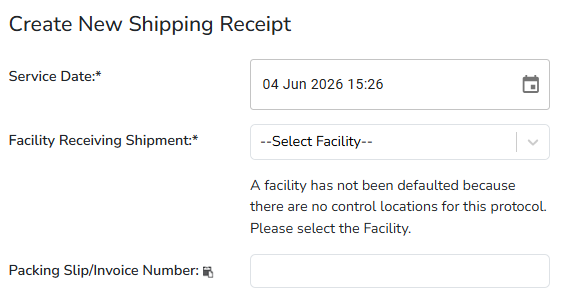
Receipt details contain the information about the receipt such as date received and courier information.
-
Modify the Service Date, as needed.
The Service Date defaults to the current date and time, but can be adjusted as needed. The service date drives where the receipt will appear on the DARF and other reports. If backdating the inventory receipt, it is recommended to add an accountability comment as it will not match the recorders timestamp.
- Select a Facility Receiving Shipment. This may already be defaulted, but it can be modified if the user has access to multiple facilities and they are listed on the protocol.
There are two factors that go into the facilities available for selection on the Receive Inventory screen:
-
The facility(ies) on the protocol. Any facility on the protocol can be selected to receive inventory too.
-
The facilities of the “Control Inventory Location” on the Drug Build. If each drug build has a “Control Inventory Location” in the same facility, “Facility Receiving Shipment” will be defaulted to that facility. The receive screen will indicate this by displaying “The Facility is defaulted based on the Control Location of the Protocol Drugs.” If one of those builds has a “Control Inventory Location” in a different facility on that protocol, “Facility Receiving Shipment” will be toggled to “Select Facility”. The receive screen will indicate this by displaying “This Protocol has Control Locations in the following Facilities: IDS Pharmacy, Cancer Center IDS. Please select the Facility.”
It’s important to note, when a user selects a facility to receive inventory to, but that facility is NOT where the “Receiving Inventory Location” is per the drug build, then when entering inventory data for a drug the “Receiving Inventory Location” dropdown will indicate “Select Location” and the user must select an inventory location in that facility where to receive the inventory to.
-
- (Optional, but highly recommended) Enter a Packing Slip or Invoice Number for the shipment.
- If entered, the data will be displayed on the DARF as well as other reports.
- (Optional) Enter a Courier.
- If entered the data will be displayed on Shipment Receipt Reports
- (Optional) Enter a Tracking #.
- If entered the data will be displayed on Shipment Receipt Reports
- (Optional) Enter any Temperature Information.
- If entered the data will be displayed on Shipment Receipt Reports
- (Optional) Enter any Accountability Comments about the receipt.
- If entered, this data will appear on the DARF under each line item received
- Double check information is correct and click Next. Information entered here can be modified later, but it will be considered a shipment edit.
Step 2 - Inventory Details
At this section of the receipt, you are going to add inventory to the receipt. You will want access to the packing slip or the inventory itself. Inventory added here is not added to usable inventory until the shipment has been marked as complete.
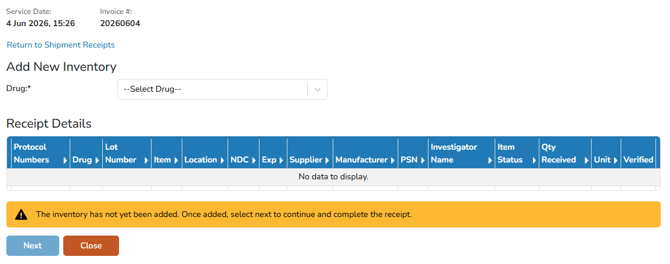
If this is the first receipt on a protocol, it will default to Add New Inventory, otherwise it will default to View and Add to Existing Inventory.

If you are receiving inventory as Itemized inventory or a lot number that you have not received before, you will want to use Add New Inventory.
If you are receiving inventory that you have received before, such as non itemized inventory, you can use View and Add to Existing Inventory to increment it into an existing inventory line item, even if you don't have any current inventory. Using this pathway does not allow for inventory modifications such as lot number or supplier/manufacturer, but you can adjust the quantity you have received.
If you are unsure which path to choose, use Add New. If the inventory entered matches with current or past inventory, it will be incremented into that Inventory ID.
Step 2a - Adding Inventory Details with Add New
- Select a Drug from the drop down list
- Click on the Add New radio button
- Enter the Lot Number
- Enter any Item Numbers. If inventory is not itemized, you can skip this field.
- If inventory is itemized, you will want to enter the Item/Kit numbers separated by lines, or a comma.
- You can also use the Generate Sequence of Item Numbers to produce a series of item numbers with a prefix, number range, and suffix. If you wish to use multiple times, you will want to generate one set, save the inventory to the receipt, and then generate another sequence of numbers.
- Enter in the Quantity of Each
- If inventory is not itemized, enter the total quantity.
- If you are receiving itemized inventory, in most cases, you will enter 1.
- If you received 30 itemized kits and enter 1 for this field, you will receive 1 inventory item for each value entered in the Item Numbers field for a total of 30.
- If you received 10 itemized kits and enter 10 for this field, you will receive 10 inventory items for each value entered in the Item Numbers field, for a total of 100.
- Enter the Expiration Date in DD MMM YYYY format.
- If the Expiration Date is Unknown, users can check the Unknown box.
- (Optional) Add a Recheck Date. This is recommended for items that do not have an expiration. These date function similar to expiration dates and will create an alert in Vestigo when the date is near or past, but not prevent dispensation.
- Modify the Item Status as needed. The default is Intact but can be modified to the following statuses.
- Intact - Items will be received intact and added to usable inventory upon completion of the receipt.
- Unfit for Use - Items will be received and immediately adjusted out of inventory and into quarantine. You can also choose to immediately destroy the inventory or sent it back to sponsor. If the drug build is set to have return verification, the only option will be to Send to quarantine.
- Lost in Transit - Inventory shipped to site but never received, it will
not be entered as inventory but will be documented on the Shipping Receipt Report
- (Optional) Add an NDC number
- This will automatically populate if the drug build is set with a default NDC but, but can be modified during receipt or at a later date with an inventory edit.
- (Optional) Modify the Supplier or Manufacturer, if needed.
- This will automatically populate based on the drug build but can be modified during receipt or at a later date with an inventory edit.
- (Optional) Modify the Receiving Location, if needed.
- This will automatically populate based on the drug build but can be modified during receipt or at a later date with an inventory transfer.
- (Optional) Modify the Patient/Subject, if needed.
- This field can be used if the inventory was received as subject specific.
- (Optional) Modify the Ordering Investigator, if needed.
- This field may not be visible if the protocol is not set to require tracking by ordering investigator.
- Click Save
Step 2b - Adding Inventory Details with View and Add to Existing Inventory
- Select a Drug from the drop down list
- Click on the View and Add to Existing Inventory radio button
- In the Lot Number drop down menu, select a lot number that you want to receive.
- If the lot number is not present, you have not previously received that lot number.
- In the grid box, users can select the inventory line item that they want to add inventory too.
- If you do not see any inventory, you will want to uncheck the Only Show Inventory with a QOH > 0 flag
- Enter in the Quantity of Each to receive
- The Expiration Date will already be populated but can be modified as needed
- If modified, the inventory be received as a new Inventory ID
- If the Inventory ID had a Recheck Date applied to it, you can modify it here as needed. If it did not, the Recheck Date field will not be visible and you can skip this step.
- Modify the Item Status as needed. The default is Intact but can be modified to the following statuses.
- Intact - Items will be received intact and added to usable inventory upon completion of the receipt.
- Unfit for Use - Items will be received and immediately adjusted out of inventory and into quarantine. You can also choose to immediately destroy the inventory or sent it back to sponsor. If the drug build is set to have return verification, the only option will be to Send to quarantine.
- Lost in Transit - Inventory shipped to site but never received, it will
not be entered as inventory but will be documented on the Shipping Receipt Report
- No other fields are modifiable in this pathway.
- Once the entries have been entered, click Save to add the inventory to the receipt.
This adds the inventory to the shipment receipt details at the bottom of the page. Users can add additional inventory to the shipment receipt, or they can click Next to go to Workload and Billing section.
Step 3 - Workload and Billing
The workload and billing section will display all fees and workload that are associated with Shipment Receipts on this protocol. Users can do one of the following actions.
- Leave all fees and workloads as default values and click Next.
- Choose not to record any fees or workload by check the Do Not Record or Do Not Charge, and then click Next.
- Modify existing fees and/or workload to the appropriate number of minutes or amount and then click Next. It is recommended to leave the Service Dates as the default value.
- Users can click Add New for Workload or Protocol Fees. If a user uses this pathway, this will add a workload/fee to this receipt and all future receipts. Once the fees are added, click Next.
Step 4 - Confirming the Shipment Receipt
The final step in a shipment receipt is confirmation screen. This is final chance for a user to edit any inventory prior to completing the receipt. Once the receipt is completed, users have to go through a different pathway to edit inventory.
The confirm screen may or may not display information regarding verification requirements your site may have. If your site uses Shipment Receipt Verification, please skip to this section to finish completing out the receipt.
It is possible for a shipping receipt to contain drug builds that do and don't have shipment receipt verification. In these instances, the Recorder may differ between drug builds where the verifier also completes the shipment.
Step 4a - Confirming the Shipment Receipt without Shipment Receipt Verification
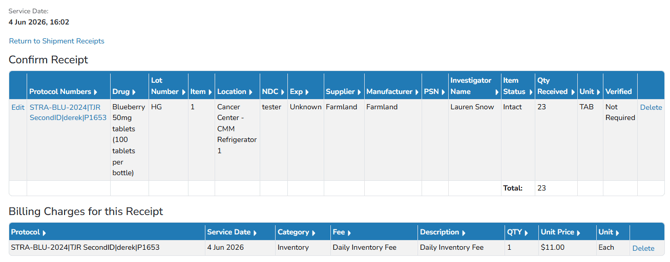
The page will display all inventory in a grid for review. If there are more than 5 items, the inventory may be paginated. Users can select from the drop down menu how many rows they would like to view.
Confirming the Receipt
If the receipt looks correct, users can click on Complete Receipt to record the receipt, and inventory will be available for transactions. At this point, Pick/Stock labels will print if your site utilizes those labels.
If edits need to be made to a completed receipt, users will need to use the View/Edit Inventory link from the inventory tab to make edits.
Unlike Shipment Receipt Verification, the user who clicks the complete shipment button is marked as the recorder on the DARF for the entire shipment.
Delete an Inventory Line Item
If an inventory line item needs to be deleted, users can click on the Delete hyperlink on the right side.
Editing an Inventory Line Item
If an inventory line item needs to be modified, users can click on Edit on the left side. This will open a menu to allow you to make any modifications to that line item as needed.
Note: You cannot modify the Drug selected. If that needs to be edited, you will want to delete that line item, close the receipt and reopen the receipt with Add to Shipment Receipt.
Step 4b - Confirming the Shipment Receipt with Shipment Receipt Verification
The final step in a shipment receipt is confirmation screen, but this screen will display an additional section to allow for Shipment Receipt Verification and have additional columns.
The page will display all inventory in a grid for review. If there are more than 5 items, the inventory may be paginated. Users can select from the drop down menu how many rows they would like to view.
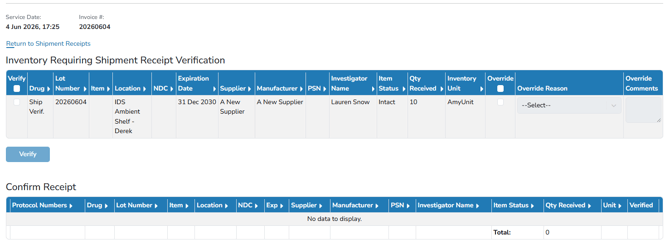
The inventory on the shipment receipt requires an additional check before the inventory can be received. Depending on how your site has set up permissions and drug builds:
- Users with appropriate permissions may be able to self verify the inventory line items
- Another user with appropriate permissions will have to verify the shipment inventory line items before proceeding
- Users with appropriate permissions can override the verification
Verifying the Inventory Line Item
If the drug allows self verification and the user has ShipmentVerify permissions, the user who added the line item can also verify the item. Users can select the verify box on the left and click Verify.
If self verification is not allowed, another user will have to verify the line item.
Overriding the Verification
Users with appropriate permissions can select the Override box on the right and will be forced to select a reason from the dropdown menu. Enter a comment, if required, and click Verify.
A system administrator must establish reasons prior to users using the override function. Some reasons require comments to be entered, while some may be optional. If you are overriding a verification, it is recommended to add a reason, even if it is not required.
Confirming the Receipt
If the receipt looks correct, users can click on Complete Receipt to record the receipt,eipt and inventory will be available for transactions. At this point, Pick/Stock labels will print if your site utilizes those labels.
When using Shipment Receipt Verification, the person who created the original receipt will be documented as the Recorder on the DARF. The Verifier will also be listed on the DARF. Because the verification is done prior to the recording of the receipt, the verification time stamp will always be before the recorder's timestamp.
If edits need to be made to a completed receipt, users will need to use the View/Edit Inventory link from the inventory tab to make edits.
Delete an Inventory Line Item
If an inventory line item needs to be deleted, users can click on the Delete hyperlink on the right side.
Editing an Inventory Line Item
If an inventory line item needs to be modified, users can click on Edit on the left side. This will open a menu to allow you to make any modifications to that line item as needed. If the user edits inventory that someone else entered, they become the recorder of that line item and may not be allowed to verify the line item if self verification is disabled.
Note: You cannot modify the Drug selected. If that needs to be edited, you will want to delete that line item, close the receipt and reopen the receipt with Add to Shipment Receipt