Some sites have multiple facilities, and they must send inventory from one Vestigo Facility to another. This can be accomplished using the Immediate Transfer pathway. That pathway documents the recorder as the Shipper and Receiver.
Send Outs allow for a full Shipment Receipt including documentation of who initiates the send out and who received the send out, and also allows for users to create documentation to include on the receipt.
Required Permissions
Users must be able to access to the protocol to receive inventory, which may require additional permissions.
This guide is broken down into sections and covers how to create an internal send out to another Vestigo Facility.
- Creating a Send Out
- Send Out Details
- Adding Inventory to the Send Out
- Create the Packing Slip Details
- Workload and Billing
- Confirming the Send Out
Creating a Send Out
- Navigate to the protocol
- Users may have to complete any competencies that are associated with the protocol.
- Click on the Inventory Tab
- Click on Send Out Inventory
- Then click Add New
Step 1 - Send Out Details
Receipt details contain the information about the Send Out such as date sent and Facility receipt information.
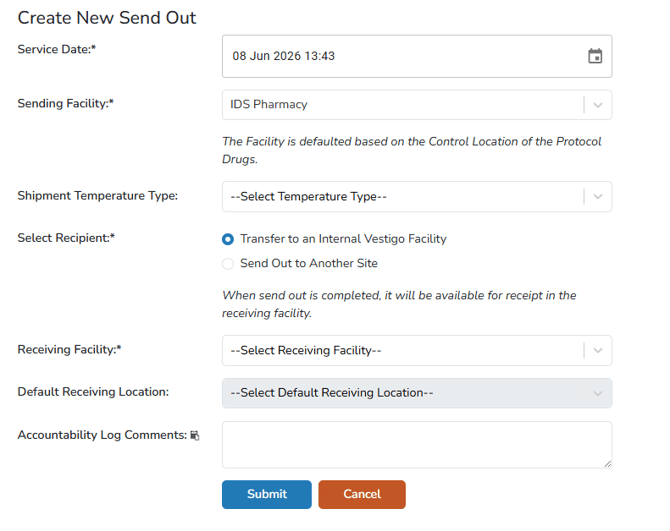
-
Modify the Service Date, as needed.
The Service Date defaults to the current date and time, but can be adjusted as needed. The service date drives where the Send Out will appear on the DARF and other reports. If backdating the Send Out, it is recommended to add an accountability comment as it will not match the recorders timestamp.
- Select the Sending Facility. This may already be defaulted, but it can be modified if the user has access to multiple facilities and they are listed on the protocol.
- (Optional) Select the Shipment Temperature Type.
- If a type is selected, it will limit the drugs to select when selecting inventory in Step 2, as well as limit the default receiving locations.
- Select Transfer to an Internal Vestigo Facility for the Recipient.
- In this guide, we are doing an internal send out to another Vestigo facility. To learn more about an external send out, use this link.
- Select the Receiving Facility. This can be the same as the sending facility, but in most cases, it is different.
- A use case for same facility in both sections would be to transfer protocol inventory to another location in the facility.
- (Optional) Select the Default Receiving Location. This will be the location that the inventory will be received into. Can be left blank or not selected.
- If no location is selected, the receiver will be forced to select a location on receipt.
- Enter any Accountability Log Comments you wish to make on this Receipt. Comments will be visible on the DARF for both Send Out and Receipt.
- Double check information is correct and click Submit. Information entered here can be modified later, but it will be considered a shipment edit.
Step 2 - Adding Inventory to the Send Out
In this step, users add inventory as needed to the send out.
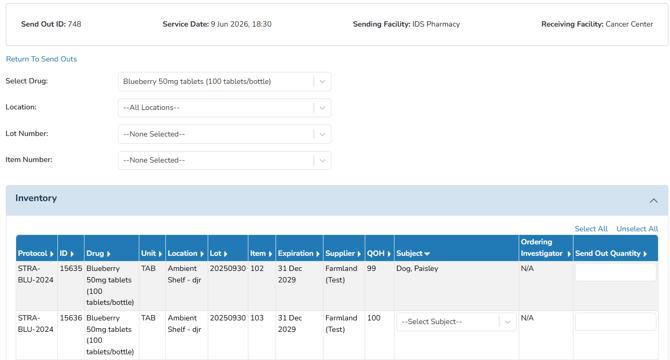
-
In the Drug dropdown, select the appropriate drug build.
- If a shipment type was selected in the Send Out Details, this drop down list will limit the selections users can choose.
- (Optional) Apply any filters as needed to narrow down the results visible on the screen.
- (Optional) Users can assign inventory being sent out to a subject if it is already not assigned to a subject. If left blank, the inventory will be sent as general inventory.
If you assign inventory to one subject, you cannot assign any other inventory from that line item to another subject on this send out. If you need to assign inventory to multiple subjects on the same send out, users will want to use the Immediate Transfer pathway prior to creating the send out.
If inventory is already subject specific, the inventory cannot be modified through a send out. Instead, it is recommended users use the Immediate Transfer pathway to transfer the inventory to a different subject prior to creating the send out. - In Send Out Quantity column, enter the number you wish to include in the send out. Optionally, you can use the Select All link to include all available quantity of inventory visible on the screen to include in the send out.
- Once the inventory quantity is selected, click the blue Save Selected Inventory
- The Inventory select will then appear in the Send Out Details under the available inventory grid.
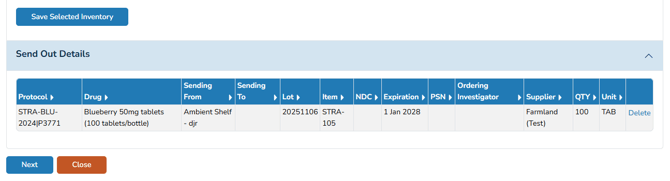
- (Optional) If you need to add additional items to the send out, you can select additional inventory from the available inventory, or you can change the Drug drop down to add additional drug builds to the send out.
- Click the blue Next button.
Step 3 - Create the Packing Slip Details
The packing slip details includes information on the packing slip that can be generated once the send out is completed and sent. Users can optionally add information to this section or skip it entirely, but adding information is beneficial to the receiving user, and can appear in various shipment reports.
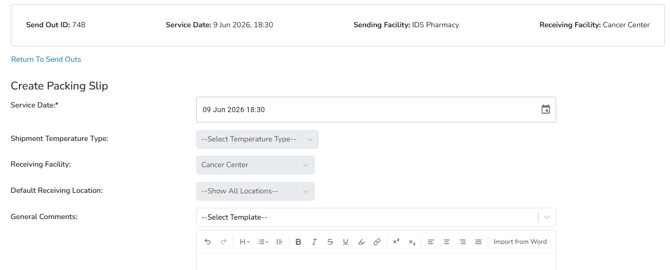
- The Service Date populates from the Send Out Details, but can be adjusted as needed here. It is recommended to leave this as is.
- The Shipment Temperature Type, Receiving Facility, and Default Receiving Location cannot be adjusted. If this does need modifications, the sending user will have to delete the entire send out and start over.
- Users can enter General Comments that will appear on the packing slip. Optionally, if your site uses templates, users can select a template from the drop down menu.
- Users can enter Receipt Instructions that will appear on the packing slip. Optionally, if your site uses templates, users can select a template from the drop down menu.
- The Courier field allows users to enter the courier that transported the Send Out
- The Tracking # field allows users to enter any available tracking information for the Send Out
- The Reference 1 and 2 fields can be used for anything as the site needs.
- Users can enter the Temperature on Departure for the shipment, if known.
- If the Accountability Log Comments require editing, users will need to back out of the send and edit the Send Out from the Send Out Inventory screen.
- Click the blue Next button.
Step 4 - Workload and Billing
The workload and billing section will display all fees and workload that are associated with Shipment Receipts on this protocol. Users can do one of the following actions.
- Leave all fees and workloads as default values and click Next.
- Choose not to record any fees or workload by check the Do Not Record or Do Not Charge, and then click Next.
- Modify existing fees and/or workload to the appropriate number of minutes or amount and then click Next. It is recommended to leave the Service Dates as the default value.
- Users can click Add New for Workload or Protocol Fees. If a user uses this pathway, this will add a workload/fee to this receipt and all future receipts. Once the fees are added, click Next.
Step 5 - Confirm the Send Out
The last step in creating a send out allows the send user to visually inspect the Send Out information, as well as the inventory and any fees included in the Send Out. The Send Out is not marked as shipped and inventory decremented until a user clicks the blue Complete button, and then the Confirm button.
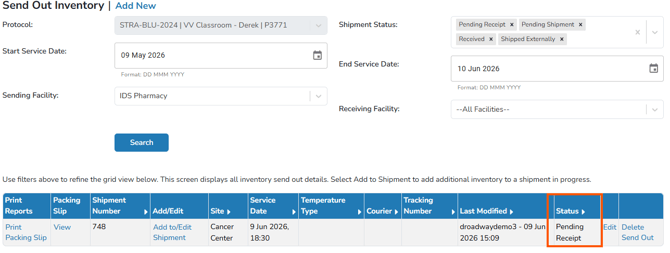
Once the Send Out is confirmed, the Send Out will appear in the Send Out inventory screen with a status of Pending Receipt.
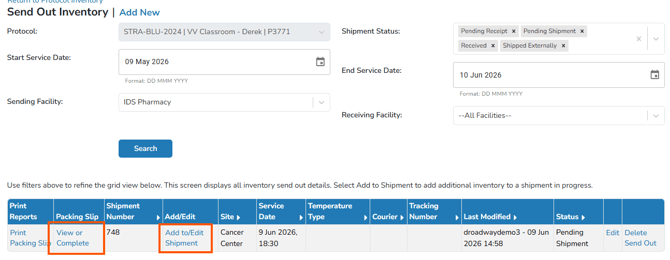
Optionally, users can Save Progress & Close to return to the send out at a later time. If this option is chosen, users can access the Send Out from the Send Out Inventory screen on the protocol and click on View or Complete, or Add to/Edit Shipment.
Packing Slip
Vestigo will generate a PDF of the packing slip when users click on the Print Packing Slip link. This can be done prior to completing the send out or after.
Send Out Blinding
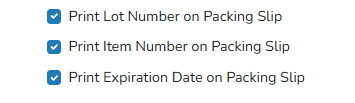
By default, Vestigo prints the Lot numbers, item numbers, and expiration dates, on the packing slip, but users have the option to uncheck the send out flags to blind this information on the Packing Slip.