
Enrolling the participant into a protocol is a two-part process. The first part involves entering the participant into Vestigo, if it didn't previously exist. The second involves enrolling that participant into the correct protocol and arm.
Managing participants in a protocol is done on the Patients/Subjects tab of the Protocol Snapshot. On this tab, you will see a list of participants currently enrolled in the protocol and links to modify certain parts of the participant’s enrollment.
Required Permissions
ViewPatientSubjects - View patient/subjects in a protocol. Protocol Snapshot permissions are required
EnrollPatients - Ability to enroll patients into a protocol
EditPatientEnrollment - Allows the user to edit the patient study number and the date of enrollment for a given patient/subject enrolled in a protocol
-
Navigate to the Protocol
-
Click on the Patient/Subjects Tab.
-
Select the Enroll New Patient/Subject link
Tip - If the Enroll link is not active, please check the status of the protocol to ensure new participants can be enrolled.
-
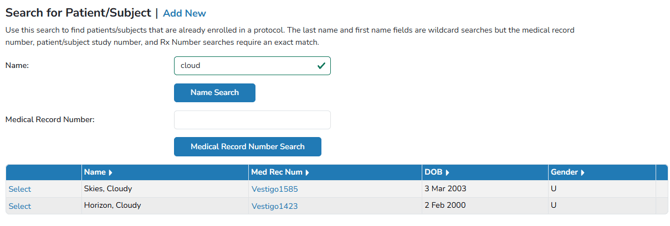
On the Search screen, users can search by name or MRN to ensure the participant isn’t already enrolled in Vestigo.
-
If a participant displays, click Select to then enroll that participant into the study and skip to step 7
-
If the participant is not located via the search, click the Add New link
-
Users will want to enter the participant’s MRN, or use the Vestigo generated MRN option
-
Enter the participant’s first and last name, gender and date of birth (if the site requires date of birth).
-
Click on Save Patient (Quick Add) if you do not wish to enter any other information for this patient and proceed to enrolling the participant.
-
If you click Save Patient (Full Profile), you can add additional information by expanding the following sections: Demographics, Height, Weight, Allergies, or Alerts. Once entered, click Save Full Profile to start enrolling the participant.
-
To add multiple allergies or alerts, select Add New after each entry. Sections save automatically as you enter data; use the “-” to collapse sections when finished.
-
-
-
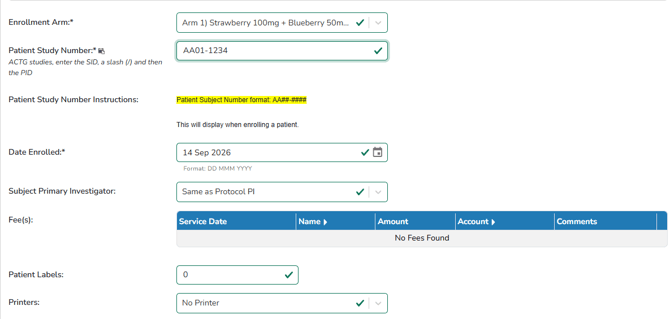
- Users will need to select an Enrollment Arm from the Arm drop down menu
- The participants Patient Study Number (PSN) will need to be entered.
Tip - If no PSN is assigned, please follow local policies on how to add a PSN.
- (Optional) Adjust the Date Enrolled
- Adjust the Subject Primary Investigator or leave as Same as Protocol PI
- Click the blue Submit button
Caution - If a PSN is entered that already exists on the protocol, the user will see a validator message indicating the entered Patient Study Number is already in use on the selected arm. You may click Save again to override this warning. Users are recommended to doublecheck the PSN and make any corrections before override the save.
Enrollment Fees
When the participant is enrolled, any fees added via Edit Protocol > Billing > Patient Fees will be presented on the enrollment panel. Users can enter comments, edit the amount, and/or mark them as do not charge.
When participant fees are charged during enrollment, the Fees(X) link will indicate the number of scheduled fees that will be charged over the frequency selected. Any “Activity” (enrollment related) fees will not be included in this count as they are not scheduled.