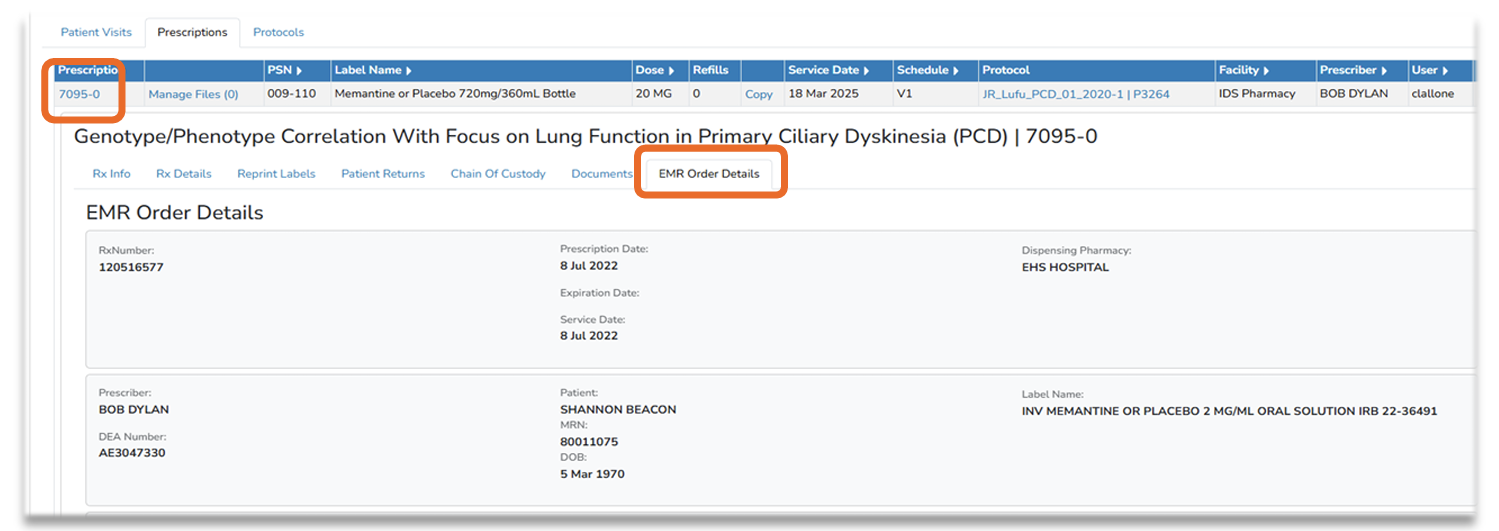
When processing an order from the EHR Message Queue, the user will be guided through a series of checks to ensure the order is processed correctly. These steps include:
- Is the EHR MedID found on a Vestigo protocol order build that is available in the facility logged into?
- Is the prescriber on the prescription a contact in Vestigo? If so, has their information changed?
- Do you want to select the prescriber, or type in their name for this dispense?
- Is the patient’s correct MRN in Vestigo? Do their demographics information match the EHR?
- Is the patient currently enrolled in the Vestigo study?
- Is the patient currently enrolled in the Vestigo arm where that order is available?
- Is the patient enrolled in multiple arms where that order is available?
In the best-case scenario, where the patient is enrolled in an active arm in Vestigo, the order is available, and the prescriber is already an Authorized Prescriber on the protocol, clicking “Process” will take the user directly to the inventory allocation step of a standard Dispense.
A more complicated scenario, where the prescriber and the patient are both unknown, is described below.
Required Permissions and Prerequisites
Users must be able to process dispenses for linked protocol orders.
The site must also be contracted for the EHR interface integration.
Processing an EHR Message
- In the facility alert queue, locate and click on the description "There are X EMR Messages awaiting an action"
- You can only process messages that are mapped to Vestigo Orders. These orders will display in the Orders Ready to Process section.
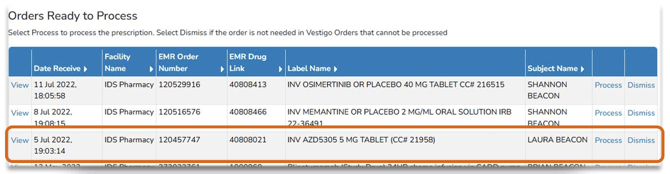
- Select Process on the message you want to complete
- If the order is tied to only one Vestigo order, Users can skip to step 5.
If the order is tied to multiple Vestigo Orders, users will be required to select an order from a drop down menu.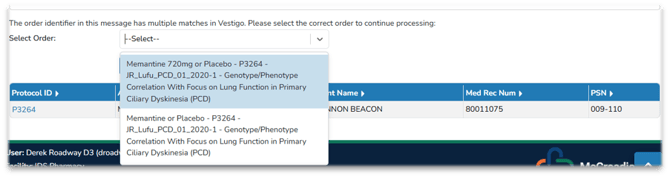
If you select an order that is not available in the arm that the participant is currently enrolled in, Vestigo will display a warning message indicating the participant is not currently enrolled in the arm for the order you are trying to dispense for
- Vestigo will check to see if the participant record MRN exists. If it finds a match in Vestigo, users will skip to step 6.
If no match is found, users will be guided through the process to create the participant. Information from the EHR message pre-populates certain fields when creating the participant.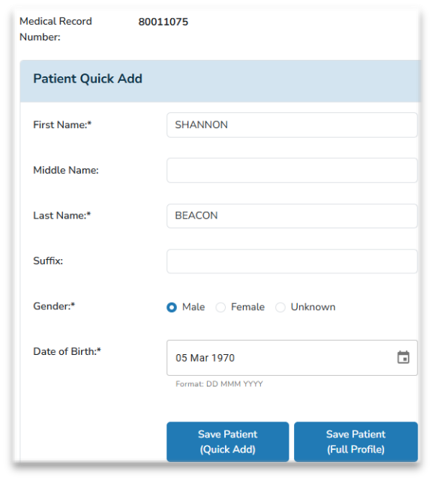
- Vestigo will check if the participant record is currently enrolled on an arm in the protocol for the selected Vestigo order. If they are, users will skip to step 7.
If they are not, users will be guided through an enrollment process that mirrors the enrolling pathway on the protocol. Users will enter the PSN and select the arm and click Submit.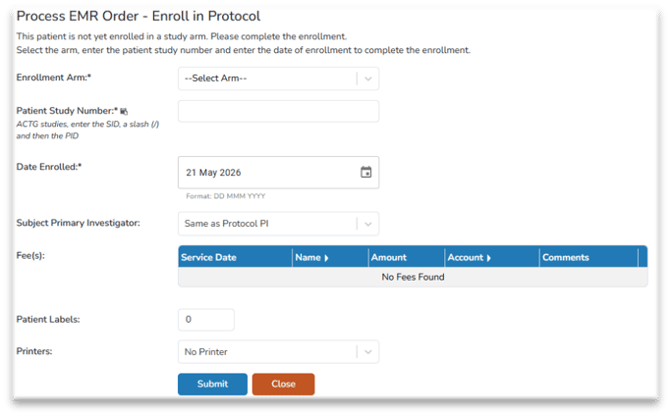
- If the EHR prescriber matches that of a Vestigo Prescriber’s DEA Number, this step would be skipped and users can skip to step 8. If the DEA number is not located within a contact record at the site, the user is presented with the EHR Order Details panel, and a pathway to select the correct prescriber.
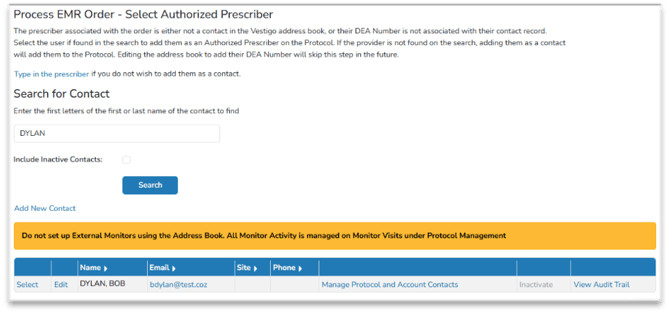
- Users can search for the prescriber. Vestigo will automatically search for contact records with the last name of provider from the EHR message. Users can select that prescriber and skip to step 8
- Users can click Type in the Prescriber which will allow the user to manually enter the prescriber at the prescription details page. If selected, users can skip to step 9.
- Users can click Add New Contact. Information will pre-populate from the EHR message, but users are required to enter an email for the contact. Once the contact is added, users will skip to step 8.

- Users can click Edit for searched contacts and add the DEA number to the contact record of any searched contacts. Once added, the user will skip to step 6.
- Vestigo will check if the matched or selected prescriber is listed as an Authorized Prescriber on the protocol. If the contact has already been added as an authorized prescriber, then users will skip to step 7.
If the matched or selected prescriber is not listed, Vestigo will guide users on how to add the prescriber to the protocol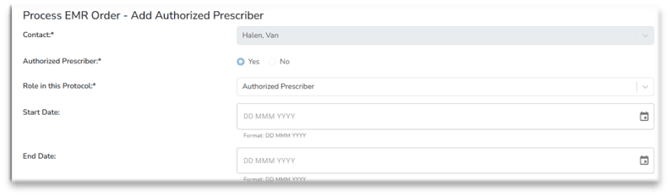
If the contact is added without authorized prescriber flag or role, Vestigo will ask you again to add the contact to the protocol.
- Users will land on the inventory selection screen for dispensing. The order drop down menu will be unavailable as the message you are processing is tied to a unique Vestigo order or the order selected in step 4. Select the inventoryto dispense and click Next
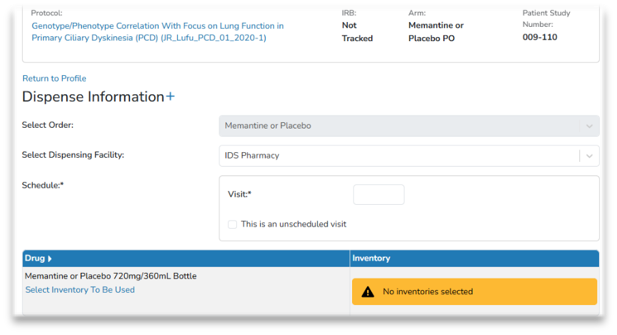
- On the Dispense page, the user can review all of the details in the EHR order by expanding the “Dispense Information +” panel.
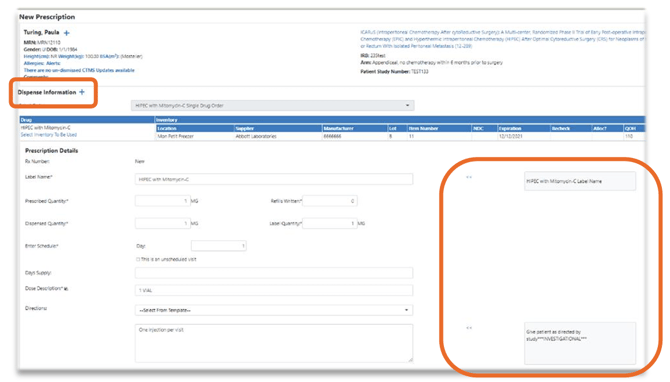
All fields pull from the Vestigo Protocol Order as the source of truth, but any of the items in the “EHR Imported Data” column can be brought over by selecting the “<<” characters. - Users can complete the dispense as normal. Depending on user permissions and order settings, the dispense may need to be verified or 2nd verified.
- After saving the Dispense, click “Back to EMR Queue” link at the bottom of the dispense screen to return to the queue.
Once the dispense is saved, the EHR message will no longer be displayed in the facility alerts. The EHR message history will be tied to that dispense indefinietly. To access the history of the prescription, click on the prescription number on the Patient/Subject profile. The user will be able to see both the EHR and Vestigo data contributing to the dispense.