
Receiving an internal protocol send out is a similar process to receiving an inventory receipt. Users will need to acknowledge the send out before the inventory is available for use in the receiving facility.
Required Permissions
InventoryReceive – Allows a user to receive inventory on a study. A user must have a role in at least one facility on the protocol and that role must have the permission InventoryReceive to access the Inventory tab and Receive Inventory screen.
InventoryReceivePendingAlert – Allows a user to receive a send out inventory shipment via the “Pending Shipments” alert panel.
Users must be able to access to the protocol to receive inventory, which may require additional permissions.
Other Permissions
InventoryReceiveInternalSendOutOnly – Only allows a user to receive from a send out inventory via the “Pending Shipments” alert panel. If this permission is checked on any user role, all users with that role will NOT be able to receive standard inventory receipts from the supplier/sponsor.
This guide is broken down into sections and covers how to create an internal send out to another Vestigo Facility.
- Initiating the Receipt
- From Alerts
- From Receive Inventory
- Confirm Shipment Details
- Confirm Inventory Details and Receipt
- Edits to Inventory Details
Step 1 - Initiating the Receipt
Users have two option to start the receipt, but user permissions may prevent one or the other. The most common method is to receive from the facility alerts, but users who don't have the InventoryReceivePendingAlert permission can receive it from the protocol itself
From The Facility Alerts
- Ensure you are logged into the receiving facility.
- Click on Pending Shipments alert tab
- Click on the alert that says "There are Xnumber incoming Shipments pending"
- Click on Receive Shipment
- Skip to Step 2
From Receive Inventory
- Navigate to the protocol
- Users may have to complete any competencies that are associated with the protocol.
- Click on the Inventory Tab
- Click on Receive Inventory
- From the Shipment to Receive drop down, select the appropriate Send Out
- Skip to Step 2
Step 2 - Confirm Shipment Details
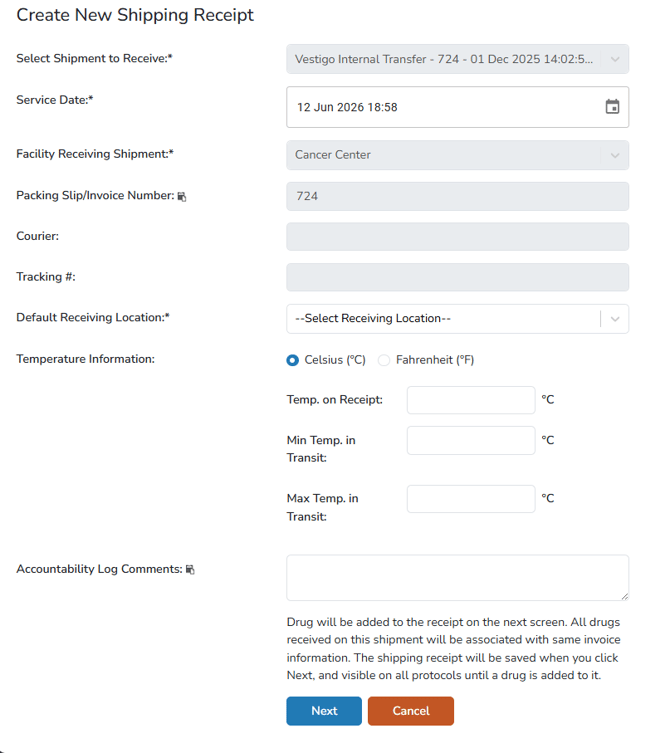
Much of the information will be populated based on the information the sender added to the send out.
-
The Service Date will default to the current date and time, but can be adjusted as needed. This date applies only to the receipt of the inventory at the receiving facility.
- The Facility Receiving Shipment, Packing Slip/Invoice Number, Courier, and Tracking cannot be modified. If these need to be modified, the sending site must edit or delete the shipment.
- If the send out creator indicated a Default Receiving Location for the inventory, this will be populated. If no location was selected during send out, the user must select a Receiving Location from the drop down menu that will apply to all inventory on the receipt.
If you need to receive inventory into multiple locations, select only one location at this time. You will be able to edit the receiving inventory at the confirm screen to edit individual receipt locations.
- (Optional) Enter any Temperature Information relating to the temperature of the shipment.
- (Optional) Enter any Accountability Log Comments that will appear on the receiving location DARF.
- Click Next.
Step 3 - Confirm Inventory Details and Receipt
The final step in receiving an internal Protocol Send out is verifying the contents of the send out is matches what was listed in Vestigo. Additionally, users can modify individual line items if needed
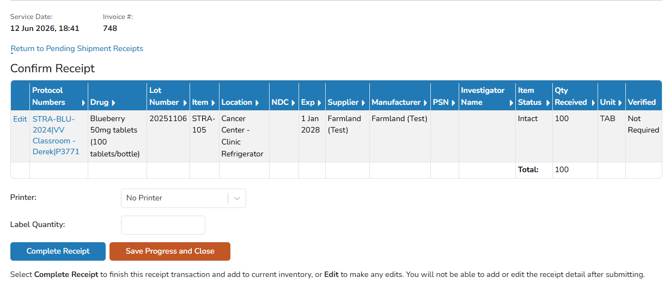
If the inventory listed on the screen matches what you received, users can click on the Complete Receipt button. That will mark the shipment as received and available for use in the receiving facility.
Edits to Inventory Details
Users can also have the option to edit certain properties associated with each line item on the receipt. Things that can be modified are: Item Status, Location, and Patient/Subject.
If the shipment was received with multiple line items but one was damaged during shipment, you can Edit the line Item, and mark the inventory as Unfit For Use, and select a disposition for the inventory.
If you need to modify the Receiving Location of the inventory, users can click on Edit, and select the appropriate location. Only locations in the receiving facility will be visible and available to choose from.