Vestigo enables users to document participant prescription returns and record the final disposition, if applicable. Please reference your site SOPs to ensure this is allowed. There are multiple methods available within Vestigo to enter a participant return, as outlined below.
- Patient/Subject Profile > Record a Patient Drug Return
- Process Returns > Enter the Rx number
- Upon verification of the Rx > Document Return/Destruction link at the bottom of the screen
- Upon saving/verifying the Rx > Navigate to Screen to enter Return/Destruction
- Prescription Search table
Each of these pathways will take the user to the same return screen.
Contents
Return, Used, and Missing Quantity
Recording a Prescription Return
Required Permissions
PatientReturns - Ability to view/add patient drug return
VerifyPatientReturns - Ability to Verify Patient Returns
OverridePatientReturnVerification - Ability to Override Required Patient Return Verifications
InventoryReturns - Ability to view and return inventory under Drug Returns queue in the Returns alerts
ReturnHistory - Return History in a protocol under Inventory>Manage Drug Returns
DrugReturns - Ability to view and process the drug returns in a protocol
Return, Used, and Missing Quantity
Vestigo allows users to capture comprehensive return information. Users can enter the following information for each return:
- Return Quantity – The Return Quantity is the quantity brought back to the pharmacy. This field must have a value entered to proceed, even if it is 0.
- Used Quantity – This is an optional field but can be entered, based on a patient diary or self-report.
- Missing Quantity – This is an optional field but can be entered, based on a patient diary or self-report.
Sites should consider adding notes in the “Destruction Instructions” field of the Drug Build to guide IDS staff on using these additional fields. The fields can also be used to mirror required entries in IRT and EDC systems.
Where Do These Fields Appear in Vestigo?
The quantities entered in the Used and Missing Quantity fields are visible on the "Returns Report," accessible via the Manage Drug Returns screen in Vestigo; however, this information does not appear on the DARF. The Return Quantity will continue to print on the DARF.
Monitors cannot access the Returns Report but can view these quantities while examining Patient Returns in the Returns tab of Vestigo Verify. In Vestigo Verify, when monitors authorize destruction or return to sponsor, the action pertains to the Return quantities. The Missing and Used quantities are provided for informational purposes only.
Recording a Prescription Return
There are several methods to access the Drug Return screen, and all methods direct users to the same screen. The following instructions pertain specifically to the Drug Return screen, with navigation options for each pathway listed below.
- Use one of the following methods to get the Drug Return screen:
- Patient/Subject Profile > Record a Patient Drug Return
- Process Returns > Enter the Rx number
- Upon verification of the Rx > Document Return/Destruction link at the bottom of the screen
- Upon saving/verifying the Rx > Navigate to Screen to enter Return/Destruction
- Prescription Search table
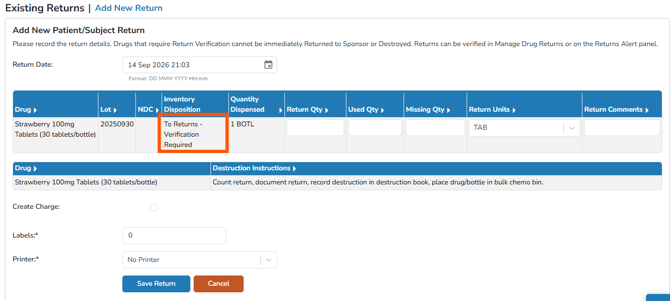
- On the patient return screen, select Add New Return, and a grid of the lot numbers dispensed will appear.
- The Service Date of the return will default to the current date and time.
- Record the return data against each lot number/item dispensed
- Return Quantity is required.
- Record the used and missing quantities (optional). Leave blank if you are not recording these values.
- The unit of the return(s) can be modified to document the participant return appropriately.
- If the return unit is different than the dispensing inventory unit, the return unit can be pre-selected by adding the “Default Return Unit” on the Drug Build.
- An optional fee can be added by clicking the Create Charge box
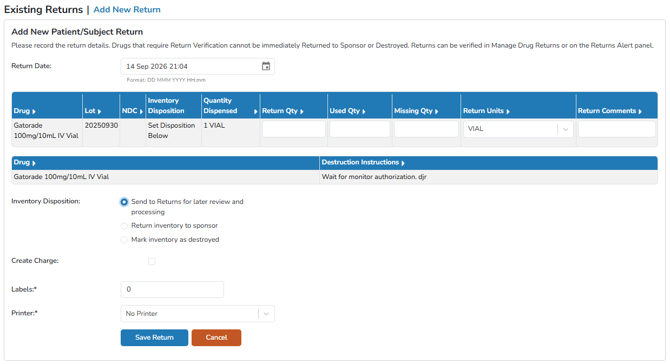
- Patient returns can be placed in one of three dispositions:
- Send Inventory to Returns for later review and processing
- Return inventory to sponsor (add comments)
- Mark inventory as destroyed (select method and vendor and add comments)
- Click Save Return
- Additional patient returns can be entered, simply repeat the steps above for the same prescription and fill.
If the drug build requires verification of participant returns, the only option available to you is to Send Inventory to Returns. If the returns are placed into “Returns for later review and processing”, they can be marked as destroyed or returned to sponsor later in “Manage Drug Returns”.