
While we hope no user has to process a temperature excursion, we know they are inevitable. Vestigo allows users to efficiently document a temperature excursion that has happened at the site in a local inventory location. Once a Temperature Excursion (TE) is recorded, Vestigo can provide an electronic form that could be used in place of a sponsor provided document.
Tips - Check with your local organization policies to ensure that Vestigo generated Temperature Excursion form is an approved replacement, and the definition of what an excursion is at your site.
Before we cover the process of recording an excursion, there are a few things to note.
- Inventory that has been adjusted out of inventory using the Adjust Inventory process will not be included in any Vestigo generated forms.
- Recording an excursion should be done after the excursion and inventory has already been physically moved to another location that is in the appropriate range.
- The Vestigo Temperature Excursion function does not move inventory from one location to another location prior to quarantining inventory. It will quarantine the inventory from the location that experienced the excursion. If this needs to be done, users can either:
- Move the inventory prior to recording the quarantine and manually adjust the inventory impacted.
- Leave inventory in place and when entering the Deviation notes, users can note where inventory was physically moved to.
Required Permissions
TemperatureExcursion - Helps to manage temperature excursions under Inventory Management
Recording an Excursion
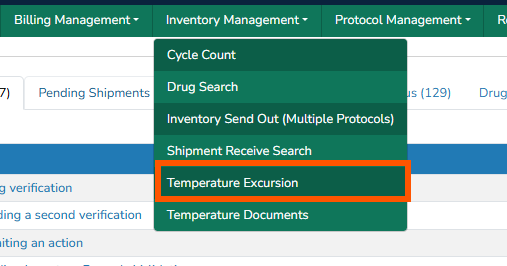
To start the process of recording an excursion, users will want to click on Inventory Management, then Temperature Excursion.
Excursion Details
The user will then have to select a Parent Location that experienced the excursion from the drop down menu.

Once that is selected, the screen expands with additional options and also displays inventory that is currently in the location selected.
Note - If you are using Parent/Child Locations, and the parent location experienced the excursion, you will have to record an excursion for each child location. Recording an excursion at the Parent Location only does not flow to the child locations.
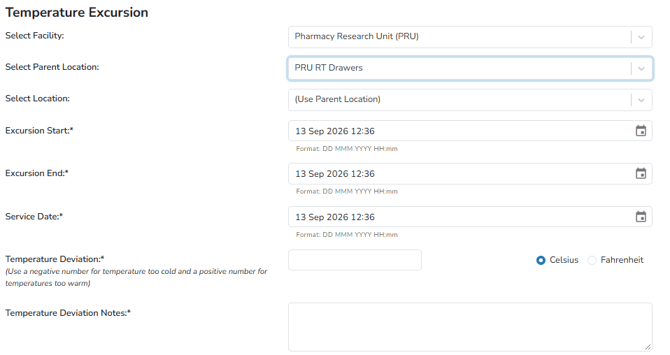 Additional options will be displayed that the user will want to modify to ensure information is captured appropriately.
The Excursion Start and End times should be the time the temperature went out of range and back into to acceptable range.
The Service Date defaults to the current date and time, but can be adjusted as needed. Important consideration: The service date determines where the TE Note and any inventory adjusts fall on the DARF for each inventory selected.
The Temperature Deviation should be used to define how far it went out of range. Use a negative number for temperature too cold and a positive number for temperatures too warm. Example: if you are recording an excursion in a controlled Ambient setting (20°C - 25°C) and the temperature dropped to 18°C, you would enter -2.
The Temperature Deviation Notes are a required field that function similar to accountability log comments. Users will want to ensure they are entering detailed information regarding the excursion, which may include where inventory was transferred to or any follow up actions taken.
Note - Site users will want to ensure they are following local policies on what they enter here.
Caution - Ensure the entered information is accurate prior to saving the excursion. Once saved, the excursion information cannot be edited.
Selecting Impacted Inventory
After entering the excursion details, users must select the inventory that was impacted. All InventoryIDs with inventory on hand in the selected location will be presented under details of the Drug Build. You will also see information related to the Temperature Excursion comments that are entered on the drug build as well.
In the image below, we see there is one line item for Blueberry 50mg tablets that has a total of 716 on hand, but we can see the Strawberry drug has itemized inventory.
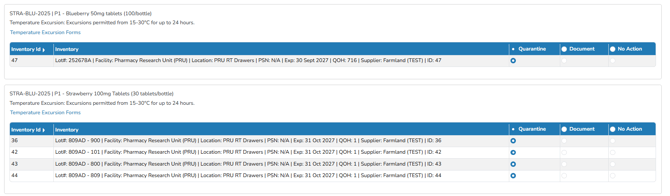
The default action for each impacted inventory is set at the drug build level, and will automatically be selected on this screen. However, it can be adjusted if it needs to be.
- Quarantine - Sites should use this option if the inventory needs to be quarantined. The inventory will be quarantined from the current location. A TE Note is also created for the inventory, and a Vestigo TE Form can be generated after entry.
- Document - This option should be used if you only want to document the excursion but not quarantine the inventory. This function creates a TE Note for the inventory, and a Vestigo TE Form can be generated after entry.
- No Action - If this option is selected, the inventory will be excluded from the TE report. No quarantine or document action is taken.
Note - If inventory is quarantined through the Vestigo TE function, the only way to remove inventory from quarantine is do manually return to stock from each individual protocol.
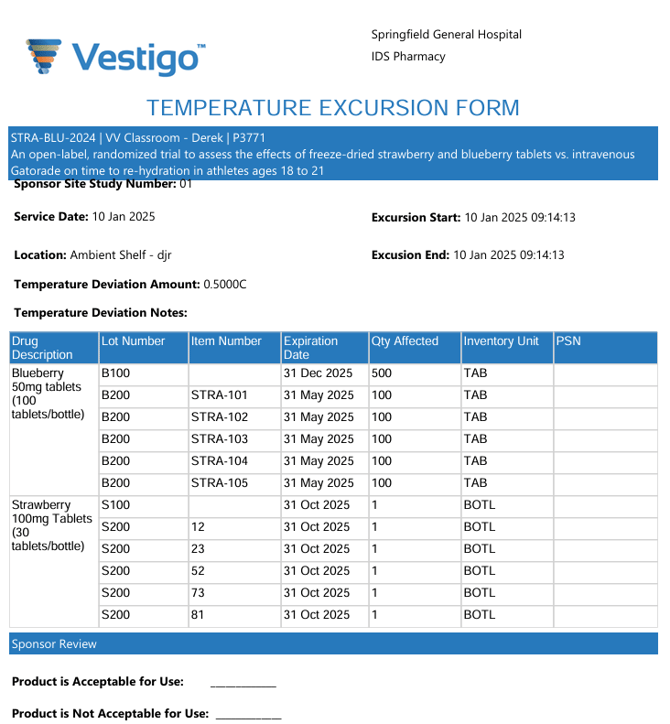
Users can optionally generate a Vestigo TE form from this screen by clicking on the Temperature Excursion Forms link under each drug build. This form can also be generated later from the protocol.
Saving the Temperature Excursion
Warning - Prior to saving the excursion, ensure all excursion details are entered correctly. Editing the excursion details after saving is not possible.
After all the selections were made, users will click Save at the bottom of the screen. Any inventory that had quaranatine selected will be placed into quarantine at the protocol.