
Vestigo provides sites with the option to upload Temperature Documents, facilitating inventory management and monitoring requests.Once a document is uploaded to a Temperature Document Storage Location, the document will be available in all protocols where inventory has ever been stored in that location. This may include temperature logs from before and after the protocol was open.
There are five categories for temperature documents in each Temperature Document Storage Location:
- Temperature Logs
- Calibration Certificates
- Communications
- Temperature Excursions
- Other
Vestigo supports up to a max of 50 MB per file, and a variety of file types that include: .doc, .docx, .pdf, .jpg, .jpeg, .png, .gif, .txt, .xlsx, .xls, .ppt, .msg, .ttv, .tiff, .pptx.
While Vestigo does support the ability to upload email messages in the .msg format, we strongly encourage users to save the email as a PDF prior to uploading to ensure the file can be viewed by all users.
Required Permissions
TemperatureLogs - Ability to manage Temperature Logs under Inventory Management.
Users must have the permission in a role for the facility to edit temperature documents for locations in that facility. If you have the permission in a Facility A but not Facility B, users will only be able to manage Temperature Documents in Facility A. The users may still see the temperature documents from Facility B in protocols where both facilities are listed.
Contents
- Creating a Temperature Document Storage Location
- Modifying or deleting Temperature Documents Storage Locations
- Adding Temperature Documents to a Storage Location
- Editing or Deleting a Temperature Document
Creating a Temperature Document Storage Location
Before users can add documents, the Temperature Document Storage Location must be created first. The Temperature Document Storage Location can contain a single document or multiple documents that are pertinent to the time frame of the Temperature Document Storage Location.
If you are a site that utilizes Parent/Child locations, you will only need to upload documents to the parent location. All documents uploaded to the parent location will pull into inventory stored in the child locations.
Currently, Vestigo does not support automated uploads of temperature documents; all documents must be uploaded manually by a site user.
When creating Temperature Document Storage Location, we recommend using a timeframe of one year when creating the Temperature Document Storage Locations. This method is most frequently utilized and offers the greatest convenience for monitors when reviewing Temperature Documents through Vestigo Verify.
- Click the Inventory Management menu
- Select Temperature Documents
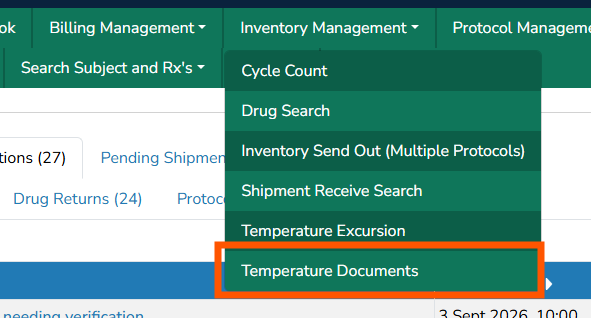
- Select Add New
- Enter the date range that correlates with the document(s) that will be uploaded, even if its in the future. Ensure you are following local site policies, but McCreadie Group recommends a year for each storage location.
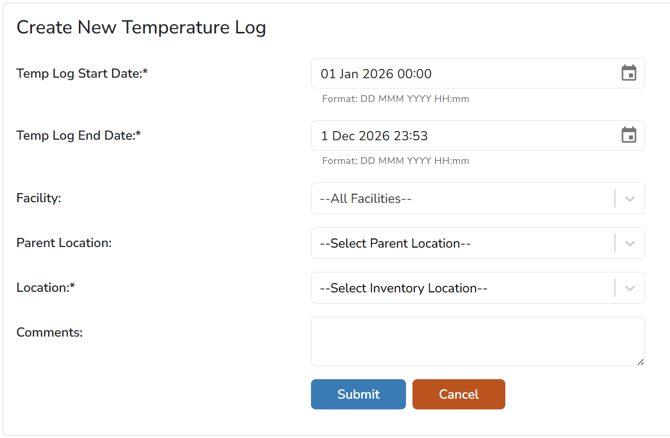
- Select the Parent Location associated with the document(s)
- The Location selection should automatically populate. It is recommended to leave this as the default.
- Enter any comments for the document(s) or inventory location
- Click Submit
Modifying or Deleting Temperature Documents Storage Locations
To modify the storage location, click the Edit link next to the location. All values set during the creation of the location can be adjusted.
Edits to a Storage Location
If documents have already been uploaded, changing the storage location for a different Inventory Location may not be suitable. All edits are recorded in the audit trail.
- Click on Inventory Management menu
- Select Temperature Documents
- (Optional) Apply any filters as needed.
- Locate the Storage location and click Edit
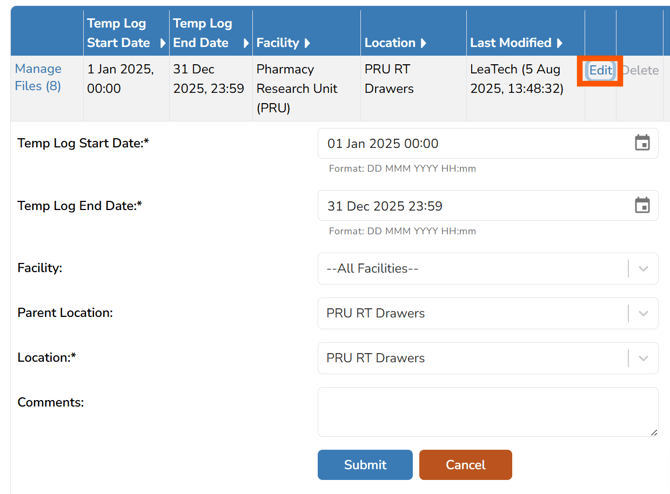
- Make the appropriate changes and click Submit
Deleting a Storage Location
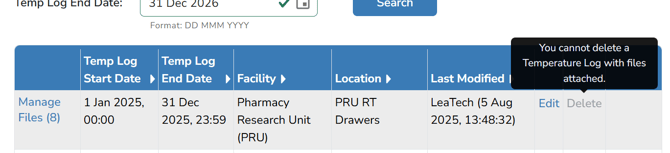
If you need to delete a Temperature Storage Location, all documents within the Storage Location must be deleted before you can delete the Storage Location. Once all files are deleted, the Delete link will become available for users to click.
Adding Temperature Documents to a Storage Location
Adding documents to a temperature storage location can be done by clicking on that “Manage Files” link on the left side of the column. There are no limits to how many files can be added to a Temperature storage location, but there are limits on each individual file.
- Click on Inventory Management menu
- Select Temperature Documents
- (Optional) Apply any filters as needed.
- Locate the Storage location and click Manage Files
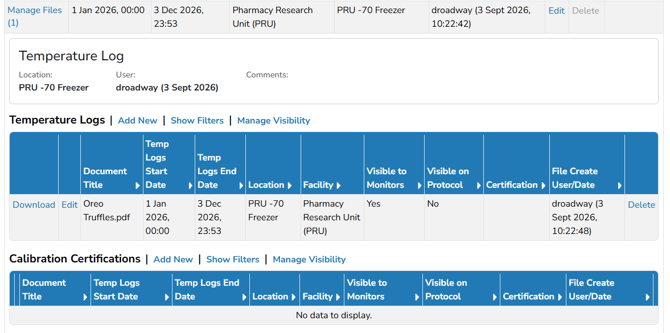
- The screen will expand for the Storage Location and show the five sections that can be added to.
- Click on Add New in the section you want to add a file to.
- If users are uploading a file, select Upload File
- (Optional) Modify the visibility options. Client settings are defaulted here but can be adjusted.
- Users can drag and drop to the area on the screen, or they can click to use the explorer to locate the file.
- Once uploaded, the screen will refresh and users will see the newly uploaded file with the selected visibility options.
- If users are creating a file, select Create File
- Enter a File Name
- (Optional) Modify the visibility options. Client settings are defaulted here but can be adjusted.
- (Optional) Users can select a template that was built prior to creating the protocol document from the Template Drop Down. Only one template can be used at a time.
- Enter the note into the note section
- Click Save
Once uploaded, the document will be available on every protocol where inventory has been received into the location defined at the Storage Location level.
Editing or Deleting a Temperature Document
If the document was uploaded to the incorrect category or for any other reason, it can be deleted by selecting the “Delete” link on the right of the document name.
Deleted documents are permanent and cannot be recovered. Please ensure you have downloaded or backed up the file prior to deletion.
- Click on Inventory Management menu
- Select Temperature Documents
- (Optional) Apply any filters as needed.
- Locate the Storage location and click Manage Files
- The screen will expand for the Storage Location and show the five sections that can be modified.
- Locate the document to be deleted and click Delete
- Users will have to click Confirm to complete the document deletion