
The Parent/Child inventory locations in Vestigo are designed to allow specific tracking of inventory down to discrete inventory locations but represent a collection of inventory locations as a single location for accountability purposes. Sites that typically use this function are NCI sites.
For example – you have a room full of shelves. For inventory tracking, you want to identify each shelf separately so that it is easier to find things. Your parent location may be named IDS Ambient Shelf. Nested under that parent location, you may have additional locations named IDS Ambient Shelf 1, IDS Ambient Shelf 2, etc.
These would be considered Child or Receiving Locations and where the inventory is actually stored in Vestigo. When users generate the DARF at the protocol level, the inventory location filter will now only show the parent inventory locations and none of the child locations.
It is strongly recommended to review our Managing Inventory Locations article prior to making any changes to inventory locations.
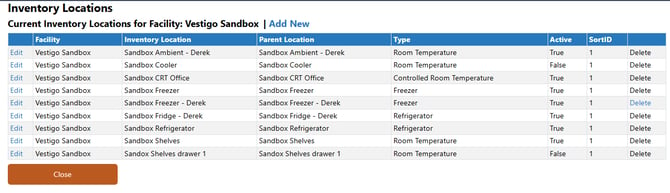
- Creating a Parent Location for Parent/Child Inventory Locations
- Creating a Child Location for Parent/Child Inventory Locations
- Modifying a Parent/Child Inventory Location
- Inactivating a Parent/Child Inventory Location
- Reactivating a Parent/Child Inventory Location
- Deleting a Parent/Child Inventory Location
Permissions Needed
AdminMain – Access the application administrative menu.
EditClientandFacilitySettings - Along with AppAdmin, this permission should enable/disable the "Edit Client and Facility Settings" page.
FacilityEdit - Along with AppAdmin and EditClientandFacilitySettings access, this permission should enable/disable to view/edit facilities located under "Edit Client and Facility Settings" page.
InventoryLocations - Application Administration > Edit Client and Facility Settings > View/Edit Facilities > Inventory Locations. Ability to view/edit/add new inventory locations. AdminMain and FacilityEdit permissions are required.
Creating a Parent/Child Inventory Location
The first step is to create the Parent Location. Once the parent location is created, you can skip to Creating a Child Location to add locations
Creating a Parent Location for Parent/Child Inventory Locations
- Navigate to Application Administration
- Click on Edit and Client Facility Settings
- Click on View/Edit on the appropriate facility
- Select View/Edit for the Facility you want to add locations to
- Scroll down and click on Inventory Locations under Facility Items
- Click Add New
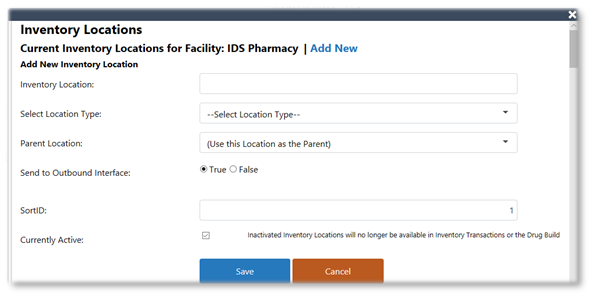
- Enter a unique and identifiable name for the location
The inventory location name will be visible on the DARF.
- Select the Location Type from the drop down menu
- Leave Parent Location as (Use this Location as the Parent)
- Leave the Send to Outbound Interface1 as True
- Leave the SortID as 1.
- Optionally, you can set this to any number and it will sort the in the Inventory Location Screen, first by this number, then by location.
- Leave the Currently Active flag as checked
- Click Save
Creating a Child Location for Parent/Child Inventory Locations
The Child Location is where the inventory will be actually received in Vestigo and will be nested under the parent location. Please ensure that location is created first prior to creating the child location.
- Navigate to Application Administration
- Click on Edit and Client Facility Settings
- Click on View/Edit on the appropriate facility
- Select View/Edit for the Facility you want to add locations to
- Scroll down and click on Inventory Locations under Facility Items
- Click Add New
- Enter a unique and identifiable name for the location
- Select the Location Type from the drop down menu
The parent and the child locations should share the same Location Type.
- In the Parent Location drop down, select the Parent Location that the child location should be nested under.
- Leave the Send to Outbound Interface1 as True
- Leave the SortID as 1.
- Optionally, you can set this to any number, and it will sort the in the Inventory Location Screen, first by this number, then by location.
- Leave the Currently Active flag as checked
- Click Save
Modifying a Parent/Child Inventory Location
Once an inventory is received, it is not recommended to adjust an inventory location and change the overall definition of the location. It should only be used to correct spelling errors. If you are moving inventory to a new location because of a deprecated location (eg, fridge died), you will want to create a New Inventory location to not impact Historical Data.
- Navigate to Application Administration
- Click on Edit and Client Facility Settings
- Click on View/Edit on the appropriate facility
- Select View/Edit for the Facility you want to add locations to
- Scroll down and click on Inventory Locations under Facility Items
- Click on Edit for the Inventory Location that needs to be modified
- Make the appropriate changes
- Click Save
Inactivating a Parent/Child Inventory Location
Inactivating a location does not remove inventory in that location. It will only prevent new inventory being added to the location. It will not appear in any inventory location drop downs.
- Navigate to Application Administration
- Click on Edit and Client Facility Settings
- Click on View/Edit on the appropriate facility
- Select View/Edit for the Facility you want to add locations to
- Scroll down and click on Inventory Locations under Facility Items
- Click on Edit for the Inventory Location that needs to be modified
- Uncheck the Currently Active flag
- Click Save
Reactivating a Parent/Child Inventory Location
- Navigate to Application Administration
- Click on Edit and Client Facility Settings
- Click on View/Edit on the appropriate facility
- Select View/Edit for the Facility you want to add locations to
- Scroll down and click on Inventory Locations under Facility Items
- Click on Edit for the Inventory Location that needs to be modified
- Check the Currently Active flag
- Click Save
Deleting a Parent/Child Inventory Location
Inventory locations can only be deleted if inventory has never been received into that location. Once inventory has been received into the location, it can only be inactivated.
Deleting an inventory location is permanent and cannot be reversed.
- Navigate to Application Administration
- Click on Edit and Client Facility Settings
- Click on View/Edit on the appropriate facility
- Select View/Edit for the Facility you want to add locations to
- Scroll down and click on Inventory Locations under Facility Items
- Click on Delete for the Inventory Location that needs to be deleted
- Click OK to confirm the deletion
1 The Send to Outbound Interface flag is a now deprecated carousel integration. This is slated to be removed in a future update