
Vestigo supports prescription entry, dispensing, refills, copying, verification, documentation, patient visits, editing, and voiding. The standard workflow begins from a participant profile, uses protocol-specific orders and inventory, records prescription and accountability information, and concludes with saving, label printing, inventory updates, and any required electronic signature.
Contents
Fields on the Prescription Details Page
Verifying and Second Verifying a Prescription
Required Permissions
CopyRX - Ability to copy a prescription into a new prescription
Dispense - Ability to generate a new prescription for a patient
EditRx - Ability to edit an existing prescription under Patients/Subjects of a protocol
Profile - View the patient's profile
Refill - Ability to refill an existing prescription
SubjectSearch - Ability to search for subjects enrolled in a protocol
Verify - Ability to verify an existing prescription
Related Dispensing Permissions
BarcodeValidation - Ability to scan barcodes to validate items being dispensed
OverridePatientReturnVerification - Ability to Override Required Patient Return Verifications
PatientReturns - Ability to view/add patient drug return
PatientSendOut - Ability to record a patient send out from patient's profile
PrescriptionInfo - Search Subject and Rx's>Search by Subject>MRN>Prescription. Ability to view prescription info of a subject
VerifyPatientReturns - Ability to Verify Patient Returns
VoidPrescriptions - Ability to void entered prescriptions
Drug Build Inventory Tracking
All three types of inventories can be used for dispensing: Full, Dispense, or None tracking. Full tracking drugs is the standard drug build setup. Users will have to select inventory that has been received already.
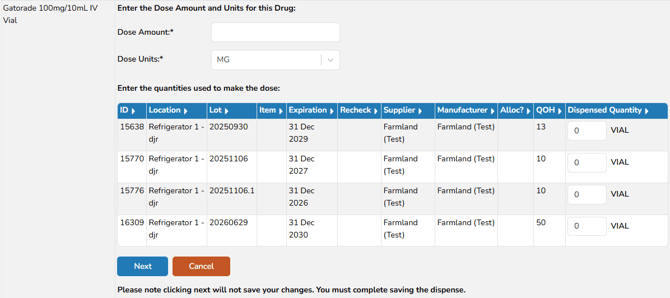
If a Dispense Only Tracking drug is used, users will be required to enter information related to the inventory used, such as Lot, Expirations, and other fields. This is most commonly used with base solution bags where they may be using a stock from a central pharmacy and full tracking isn't required, but details may still be captured on reports and DARFs.
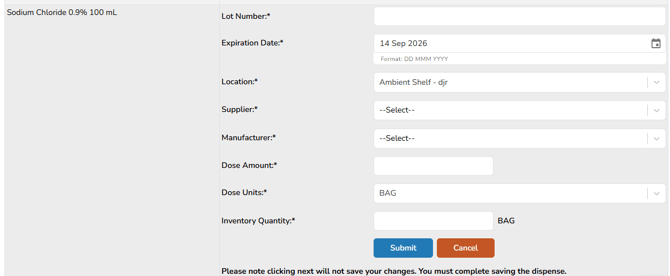
If a No Tracking drug is used, the drug build is automatically selected, but users do not need to document any details about the inventory dispensed.

Fields on the Prescription Details Page
| Field | Description |
| Rx Number | Will say New for a new prescription. Automatically assigned once saved. |
| Label Name | This field indicates the name of the item being dispensed as it appears on the label. For blinded protocols, ensure that the wording maintains blinding appropriately. Additionally, this field populates various reports, including those related to billing. |
| Prescribed Quantity | The quantity that was prescribed in terms of the Order Unit. Does not change or impact the amount of inventory dispensed. |
| Refills Written | The number of refills for the given prescribed quantity. If prescribed quantity is more than dispensed quantity, refills remaining will automatically be calculated. |
| Dispensed Quantity | The dispensed quantity in terms of the Order Unit (not tied to inventory). Does not change or impact the amount of inventory dispensed, but this amount cannot be more than the prescribed amount unless refills are written. |
| Label Quantity | The quantity to print on the label in terms of the inventory units, if different than the dispensed quantity. e.g. splitting the product over multiple containers and setting the label quantity to the amount in each container, 60 of 120 caps. |
| Enter Schedule | This is the patient schedule type details entered when the order was selected. If this is an unscheduled visit, that option can be selected which will allow you to skip the documentation. |
| Days’ Supply | The days’ supply for the patient/subject. If the days’ supply is greater than the expiry date of the medication, a soft stop alert will be displayed indicating the drug has an expiration date before the end of the supply. |
| Patient Dosing Weight | The weight entered when the order was selected; can be edited or “Do not record” can be selected. |
| Dose Description |
The description of the dose for the label. This field needs to consider blinding if needed (comes from the dose amount and units entered upon selecting the inventory. If a specific format for the dose is needed, use the Default Dose Description on the Order build. Values entered populate the Dose column on DARF. |
| Directions | The directions or sig for the prescription that pulls from the order build. Can be modified as needed for each dispense. You can also use the template drop down to fill. |
| Special Instructions | The special instructions for the prescription that pulls from the order build. Can be modified as needed for each dispense. You can also use the template drop down to fill. |
| Accountability Log Comments | Pulled in from the Order Build (editable). Information in this field will display on the Drug Accountability Record (DARF) below the dispense line. |
| Prescriber |
The prescriber for the prescription. When there is more than one authorized prescriber, the dropdown box will ask the user to select a prescriber. The Prescribers pull from the Contacts on the protocol. If the prescriber is not in the drop down, you can click the “Type In” check box and type their name in manually. |
| Route | The route of administration pulls from Order build. |
| Date Written | The date the prescription was written. |
| Prescription Expiration | The expiration date of the prescription. This will automatically adjust to one year from the date written. |
| Service Date/Time | The date of service for completing the dispensing. This defaults to current date/time but can be modified as needed. Controls where the dispense will appear on the DARF. |
| Drug Expiration | This field will be set to either the actual date of the drug expiration, the sooner of one year from the prescription date or the actual expiration of the drug, or it will be blank and you have to enter it in. This setting is configured during the Protocol Order build. |
| Preparation Time |
The time the product is prepared. Only presents when the option for “Prep Time Required” has been selected on the Order build. The site is responsible for defining what Preparation Time means. |
| Thaw Time |
The time the product starts to thaw. Only presents when the option for “Thaw Time Required” has been selected on the Order build. The site is responsible for defining what Thaw Time means. |
| Billing | The fee name and amount that will be charged. If you need to not charge the fee, click the checkbox and you will be required to enter a reason why the fee is not being charged. |
| Barcode Value for Labels | Enter a value that corresponds to a prescription specific value such as a prescription number from Pharmacy Information System. This value can be printed on the label in desired barcode format. |
| Number of Labels | Enter the number of labels to print and select the printer (dispense, prescription, and bag labels) |
Entry Pathways
Dispensing in Vestigo can be done in several ways. Users can enter prescriptions through one of these pathways:
- New Prescription link on the Participant Profile
- Refill link on the Participant Profile
- Copy a Prescription link on the Participant Profile
- Patient Visits
- Adjust Inventory: Record a Dispense
- EMR order queue - for sites with an EMR interface.
Users can click each pathway above to get a step by step guide for each pathway.
Verifying and Second Verifying a Prescription
When a non-verifying user dispenses a prescription or a refill, it works the same as when a verifying user does the dispensing, except the prescription will be recorded as being unverified. Upon saving, the prescription will show the prescription as unverified however, the inventory used on the prescription is already deducted from the inventory
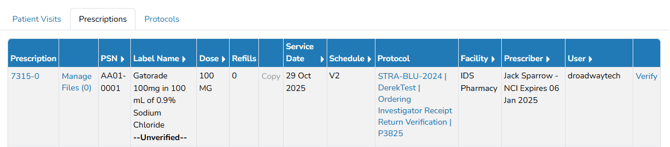
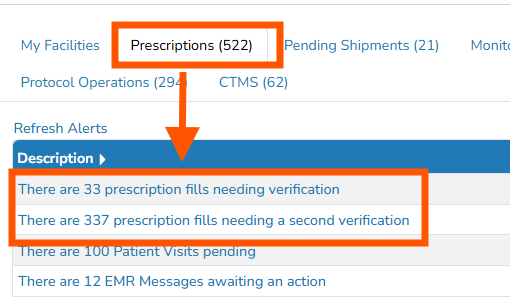 Users with permission to verify will see a Verify link dispenses that have not been verified on the participant profile. When verifying users log in, there will be an alert on the home screen with a count of Unverified Orders. To view the list of unverified orders, click on the alert link.
Fields that trigger Reverification and Re-Second Verification
Reverification would apply when:
-
A pharmacist is reverifying a technician entered prescription with a significant change
-
A pharmacist makes a significant change to their own prescription
-
A pharmacist makes a significant change to another verified prescription
- A pharmacist makes a significant change when second verifying another pharmacist's order
Unless otherwise specified, labels will re-print when a prescription requires re-verification.
|
Dispensing Field |
Significant Change to trigger reverification |
|
Dose Amount |
Yes |
|
Dose Units |
Yes |
|
Lot/Item |
Yes |
|
Dispensed Quantity |
Yes |
|
Label Name |
Yes |
|
Prescribed Quantity |
Yes |
|
Refills Written |
Yes |
|
Dispensed Quantity |
Yes |
|
Label Quantity |
Yes |
|
Days Supply |
No |
|
Dose Description |
Yes |
|
Directions text-box |
Yes |
|
Special Instructions text box |
Yes |
|
Prescriber (Uncheck "Type In" box and select from drop down) |
Yes |
|
Prescriber (Check "Type In" box and user input new prescriber) |
Yes |
|
Route |
Yes |
|
Date Written |
Yes |
|
Prescription Expiration |
Yes |
|
Service Date |
Yes |
|
Drug Expiration Date |
Yes |
|
Accountability Log Text box |
Yes |
|
Billing Fee |
No |
|
Billing Fee - Do not charge this fee/reason |
No |
|
Barcode Value for Labels |
Yes |
|
Dispense Labels |
No |
|
Prescription Labels |
No |
|
Bag Labels |
No |
|
Clear all label values |
No |
|
Printer Selection |
No |
|
COC Workflow |
No |
|
IVPB Volume fields |
Yes |
|
Patient Schedule and weight fields |
No |
|
Thaw Time/Prep Time |
No |
Refills
Most investigation orders will not have refills, but some sites do incorporate refills into Vestigo prescriptions. This can be easily accomplished by adding the refill amount written for during the original prescription entry. All refills will show the same base Rx number, but be appended with a -1,-2,-3, etc.
Refills are processed through a special link on the participant profile. Please refer to this article for processing refills
Voiding a Prescription
To void a prescription, users will need to edit the appropriate prescription, scroll down to the bottom of the Prescription Details and click the Void Prescription button. This will launch a small pop up window.
If the void button is not selectable, that means the prescription has returns associated with it. The returns must be deleted prior to voiding a prescription. This can be confirmed by checking the inventory section of the prescription details and the text will indicate “Edit Not Available”.
- Inventory: Reverse back to the original location or wasted.
- If the inventory is needed to dispense again, select to reverse. Vestigo will place the inventory of all full tracking inventories back to the original location.
- If the inventory is to be wasted, there will be a prompt to select a disposition for the returns, quarantine, destroy, or sent back to sponsor (only quarantine will be available if the return/quarantine requires verification).
- Billing: Credit the charge for the dispense or No Credit.
- Credit: if the charge has already been invoiced, Vestigo will enter a credit for the amount. If the charge has not been invoiced, the original charge will be deleted.
- No Credit: the charge will stay as originally charged.
- Void Reason: Enter reason or comments regarding the void which will appear on the accountability logs.
Warning - Once a prescription is voided, the action is permanent. Sites will be unable to reverse a voided transaction.
Documents attached to a prescription that is voided will remain attached and viewable. Documents can also be added after a prescription has been voided.
For an in depth guide on how to Void a Prescription, please check out this article.